Tutorial
Currently only few GPUs such as H100, A100 and A30 can support the MIG feature that it can partition up to seven indiviual GPU instances.
 Source: https://docs.nvidia.com/datacenter/tesla/mig-user-guide/index.html
There were few images sourced from this post.
Terminology
- GPU Engine : the worked engine on GPU. For example, copy engine (CE), DMAs, NVDEC, NVENC, etc.
- GPU Memory Slice : the smallest unit of GPU memory. The GPU memory is composed of 8 GPU Memory Slices.
- GPU SM Slice : The smallest unit of GPU SM. The GPU SM is composed of 7 GPU SM Slices.
- GPU Slice : The smallest unit in GPU. GPU Slice = GPU Memory Slice + GPU SM Slice
- GPU Instance (GI) : in the GPU Instance, it will share entire GPU slices and GPU engine. GPU Instance = GPU Slices + GPU Engine
- Compute Instance (CI) : the child category of GPU Instance (parent category)
Note
- MIG can only support the environment in the CUDA 11 / R450 of linux. Gpu driver version is
450.80.02. - When we are setting the MIG, the user has to own the permission of super user.
- After your GPU is turned on MIG mode, it is able to dynamically set GPU and no need to restart again.
- If the GPU is as the MIG mode, it doesn't support graphics APIs such as OpenGL, Vulkan, etc.
- If the GPU is as the MIG mode, it doesn't support GPU to GPU P2P.
- If the GPU is as the MIG mode, CUDA application will let the Compute Instance in the GPU Instance being a single CUDA device.
Installation
GPU driver installation can refer to this article. Please download the verison 450.80.02 or newer versions.
MIG Setup
Turn on MIG mode ➤ Create GI ➤ Create CI ➤ Start to use MIG
Turn on MIG mode
Traditionally the default MIG mode is not turned on, so the first step is to assign a GPU to turn on MIG.
sudo nvidia-smi -i 0 -mig 1
For example:
user@gpua100:~$ sudo nvidia-smi -i 0 -mig 1
[sudo] password for user:
Enabled MIG Mode for GPU 00000000:27:00.0
All done.
Check how many sets GI can be used
There are total five modes; in particular, Instances can check remaining how many quantities can be partitioned.
sudo nvidia-smi mig -i 0 -lgip
For example:
user@gpua100:~$ sudo nvidia-smi mig -i 0 -lgip
+--------------------------------------------------------------------------+
| GPU instance profiles:                                                   |
| GPU   Name          ID    Instances   Memory     P2P    SM    DEC   ENC  |
|                           Free/Total   GiB              CE    JPEG  OFA  |
|==========================================================================|
|   0  MIG 1g.5gb     19     7/7        4.75       No     14     0     0   |
|                                                          1     0     0   |
+--------------------------------------------------------------------------+
|   0  MIG 2g.10gb    14     3/3        9.75       No     28     1     0   |
|                                                          2     0     0   |
+--------------------------------------------------------------------------+
|   0  MIG 3g.20gb     9     2/2        19.62      No     42     2     0   |
|                                                          3     0     0   |
+--------------------------------------------------------------------------+
|   0  MIG 4g.20gb     5     1/1        19.62      No     56     2     0   |
|                                                          4     0     0   |
+--------------------------------------------------------------------------+
|   0  MIG 7g.40gb     0     1/1        39.50      No     98     5     0   |
|                                                          7     1     1   |
+--------------------------------------------------------------------------+
For example, NVIDIA A100 40G can provide the permutation of highest utilization as below. You can choose it with your requirement.
Source: https://roychou121.github.io/2020/10/29/nvidia-A100-MIG/
The order of creating GI is very significant, so I suggest to create it from big to small. (like showing in the graph above, from left to right.) It can avoid to happen trivial memory problem.

Create GI
Suppose I wanna create two 3g.20gb of GIs. The creating command can use Name or ID.
user@gpua100:~$ sudo nvidia-smi mig -i 0 -cgi 9
Successfully created GPU instance ID  2 on GPU  0 using profile MIG 3g.20gb (ID  9)

user@gpua100:~$ sudo nvidia-smi mig -i 0 -cgi 3g.20gb
Successfully created GPU instance ID  1 on GPU  0 using profile MIG 3g.20gb (ID  9)
Let's check the created GI.
sudo nvidia-smi mig -i 0 -lgi
For example:
user@gpua100:~$ sudo nvidia-smi mig -i 0 -lgi
+----------------------------------------------------+
| GPU instances:                                     |
| GPU   Name          Profile  Instance   Placement  |
|                       ID       ID       Start:Size |
|====================================================|
|   0  MIG 3g.20gb       9        1          0:4     |
+----------------------------------------------------+
|   0  MIG 3g.20gb       9        2          4:4     |
+----------------------------------------------------+
Check how many sets CI can be used
Assign GI (GI Instance ID) to check its CI which can be used the sets. The default CI is *.
sudo nvidia-smi mig -i 0 -gi 1 -lcip
For example:
user@gpua100:~$ sudo nvidia-smi mig -i 0 -gi 1 -lcip
+--------------------------------------------------------------------------------------+
| Compute instance profiles:                                                           |
| GPU     GPU       Name             Profile  Instances   Exclusive       Shared       |
|       Instance                       ID     Free/Total     SM       DEC   ENC   OFA  |
|         ID                                                          CE    JPEG       |
|======================================================================================|
|   0      1       MIG 1c.3g.20gb       0      3/3           14        2     0     0   |
|                                                                      3     0         |
+--------------------------------------------------------------------------------------+
|   0      1       MIG 2c.3g.20gb       1      1/1           28        2     0     0   |
|                                                                      3     0         |
+--------------------------------------------------------------------------------------+
|   0      1       MIG 3g.20gb          2*     1/1           42        2     0     0   |
|                                                                      3     0         |
+--------------------------------------------------------------------------------------+
Create CI
Suppose I wanna create two 1c.3g.20gb of GIs. The creating command can use Name or ID.
# ID
sudo nvidia-smi mig -i 0 -gi 0 -cci 1

# Name
sudo nvidia-smi mig -i 0 -gi 1 -cci 1c.3g.20gb
For example:
user@gpua100:~$ sudo nvidia-smi mig -i 0 -gi 1 -cci 0
Successfully created compute instance ID  0 on GPU  0 GPU instance ID  1 using profile MIG 1c.3g.20gb (ID  0)

user@gpua100:~$ sudo nvidia-smi mig -i 0 -gi 1 -cci 1c.3g.20gb
Successfully created compute instance ID  1 on GPU  0 GPU instance ID  1 using profile MIG 1c.3g.20gb (ID  0)
Check the created CI (select GI)
sudo nvidia-smi mig -i 0 -gi 1 -lci
For example:
user@gpua100:~$ sudo nvidia-smi mig -i 0 -gi 1 -lci
+--------------------------------------------------------------------+
| Compute instances:                                                 |
| GPU     GPU       Name             Profile   Instance   Placement  |
|       Instance                       ID        ID       Start:Size |
|         ID                                                         |
|====================================================================|
|   0      1       MIG 1c.3g.20gb       0         0          0:1     |
+--------------------------------------------------------------------+
|   0      1       MIG 1c.3g.20gb       0         1          1:1     |
+--------------------------------------------------------------------+
When you are creating GI, you wanna use the default CI that you can add
-Coption during creating GI. GPU Driver Version >450.80.02For example:sudo nvidia-smi mig -i 0 -cgi 9 -C
Final checking:
user@gpua100:~$ sudo nvidia-smi
Mon Jul 19 14:00:22 2021
+-----------------------------------------------------------------------------+
| NVIDIA-SMI 460.73.01    Driver Version: 460.73.01    CUDA Version: 11.2     |
|-------------------------------+----------------------+----------------------+
| GPU  Name        Persistence-M| Bus-Id        Disp.A | Volatile Uncorr. ECC |
| Fan  Temp  Perf  Pwr:Usage/Cap|         Memory-Usage | GPU-Util  Compute M. |
|                               |                      |               MIG M. |
|===============================+======================+======================|
|   0  A100-PCIE-40GB      On   | 00000000:27:00.0 Off |                   On |
| N/A   24C    P0    32W / 250W |     11MiB / 40536MiB |     N/A      Default |
|                               |                      |              Enabled |
+-------------------------------+----------------------+----------------------+
|   1  A100-PCIE-40GB      On   | 00000000:43:00.0 Off |                    0 |
| N/A   25C    P0    34W / 250W |      0MiB / 40536MiB |      0%      Default |
|                               |                      |             Disabled |
+-------------------------------+----------------------+----------------------+
|   2  A100-PCIE-40GB      On   | 00000000:44:00.0 Off |                    0 |
| N/A   25C    P0    32W / 250W |      0MiB / 40536MiB |      0%      Default |
|                               |                      |             Disabled |
+-------------------------------+----------------------+----------------------+
|   3  A100-PCIE-40GB      On   | 00000000:A3:00.0 Off |                    0 |
| N/A   25C    P0    34W / 250W |      0MiB / 40536MiB |      0%      Default |
|                               |                      |             Disabled |
+-------------------------------+----------------------+----------------------+
|   4  A100-PCIE-40GB      On   | 00000000:C4:00.0 Off |                    0 |
| N/A   24C    P0    33W / 250W |      0MiB / 40536MiB |      0%      Default |
|                               |                      |             Disabled |
+-------------------------------+----------------------+----------------------+

+-----------------------------------------------------------------------------+
| MIG devices:                                                                |
+------------------+----------------------+-----------+-----------------------+
| GPU  GI  CI  MIG |         Memory-Usage |        Vol|         Shared        |
|      ID  ID  Dev |           BAR1-Usage | SM     Unc| CE  ENC  DEC  OFA  JPG|
|                  |                      |        ECC|                       |
|==================+======================+===========+=======================|
|  0    1   0   0  |      5MiB / 20096MiB | 14      0 |  3   0    2    0    0 |
|                  |      0MiB / 32767MiB |           |                       |
+------------------+                      +-----------+-----------------------+
|  0    1   1   1  |                      | 14      0 |  3   0    2    0    0 |
|                  |                      |           |                       |
+------------------+----------------------+-----------+-----------------------+

+-----------------------------------------------------------------------------+
| Processes:                                                                  |
|  GPU   GI   CI        PID   Type   Process name                  GPU Memory |
|        ID   ID                                                   Usage      |
|=============================================================================|
|  No running processes found                                                 |
+-----------------------------------------------------------------------------+
Remove steps
Stop to use MIG ➤ Remove CI ➤ Remove GI ➤ Turn off MIG mode
Remove CI
Choose GI and CI to remove CI.
sudo nvidia-smi mig -i 0 -gi 1 -ci 0,1 -dci
Source: https://roychou121.github.io/2020/10/29/nvidia-A100-MIG/
Remvoe GI
Choose GI to remove GI.
sudo nvidia-smi mig -i 0 -gi 1 -dci
Source: https://roychou121.github.io/2020/10/29/nvidia-A100-MIG/
Turn off MIG mode
sudo nvidia-smi -i 0 -mig 0
Source: https://roychou121.github.io/2020/10/29/nvidia-A100-MIG/
Use MIG
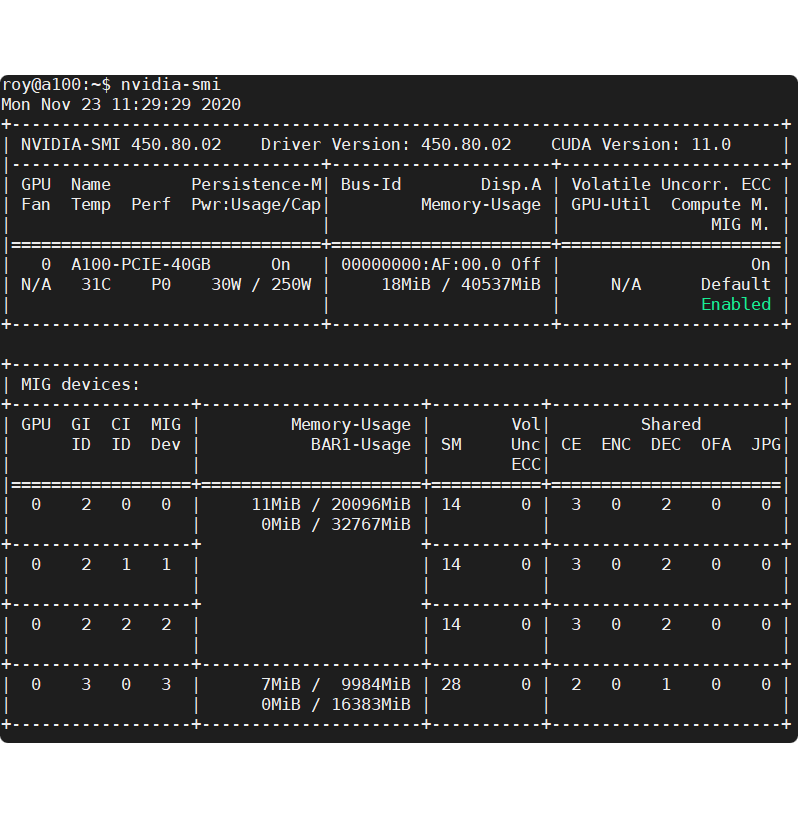
Suppose present GPU MIG partition is as follows. One 2g.10gb, and three 1c.3g.20gb
Source: https://roychou121.github.io/2020/10/29/nvidia-A100-MIG/
You can use GPU ID + MIG DEV ID or UUID to assign MIG GPU.
Use ID to assign GPU
Checking ID is like the picture below. Suppose I wanna assign the MIG DEV 1 and MIG DEV 3 of GPU 0`.
sudo docker run -it --rm --gpus '"device=0:0,0:1"' nvcr.io/nvidia/tensorflow:20.11-tf2-py3 bash
For example:
user@gpua100:~$ sudo docker run -it --rm --gpus '"device=0:0,0:1"' nvcr.io/nvidia/tensorflow:20.11-tf2-py3 bash

================
== TensorFlow ==
================

NVIDIA Release 20.11-tf2 (build 17379986)
TensorFlow Version 2.3.1

Container image Copyright (c) 2020, NVIDIA CORPORATION.  All rights reserved.
Copyright 2017-2020 The TensorFlow Authors.  All rights reserved.

Various files include modifications (c) NVIDIA CORPORATION.  All rights reserved.
NVIDIA modifications are covered by the license terms that apply to the underlying project or file.

NOTE: MOFED driver for multi-node communication was not detected.
      Multi-node communication performance may be reduced.

NOTE: The SHMEM allocation limit is set to the default of 64MB.  This may be
   insufficient for TensorFlow.  NVIDIA recommends the use of the following flags:
   nvidia-docker run --shm-size=1g --ulimit memlock=-1 --ulimit stack=67108864 ...

npm notice
npm notice New minor version of npm available! 7.0.3 -> 7.20.0
npm notice Changelog: https://github.com/npm/cli/releases/tag/v7.20.0
npm notice Run npm install -g npm@7.20.0 to update!
npm notice
Check the status of GPU MIG.
root@752c207c9f29:/workspace# nvidia-smi
Mon Jul 19 06:02:06 2021
+-----------------------------------------------------------------------------+
| NVIDIA-SMI 460.73.01    Driver Version: 460.73.01    CUDA Version: 11.2     |
|-------------------------------+----------------------+----------------------+
| GPU  Name        Persistence-M| Bus-Id        Disp.A | Volatile Uncorr. ECC |
| Fan  Temp  Perf  Pwr:Usage/Cap|         Memory-Usage | GPU-Util  Compute M. |
|                               |                      |               MIG M. |
|===============================+======================+======================|
|   0  A100-PCIE-40GB      On   | 00000000:27:00.0 Off |                   On |
| N/A   24C    P0    32W / 250W |                  N/A |     N/A      Default |
|                               |                      |              Enabled |
+-------------------------------+----------------------+----------------------+

+-----------------------------------------------------------------------------+
| MIG devices:                                                                |
+------------------+----------------------+-----------+-----------------------+
| GPU  GI  CI  MIG |         Memory-Usage |        Vol|         Shared        |
|      ID  ID  Dev |           BAR1-Usage | SM     Unc| CE  ENC  DEC  OFA  JPG|
|                  |                      |        ECC|                       |
|==================+======================+===========+=======================|
|  0    1   0   0  |      5MiB / 20096MiB | 14      0 |  3   0    2    0    0 |
|                  |      0MiB / 32767MiB |           |                       |
+------------------+                      +-----------+-----------------------+
|  0    1   1   1  |                      | 14      0 |  3   0    2    0    0 |
|                  |                      |           |                       |
+------------------+----------------------+-----------+-----------------------+

+-----------------------------------------------------------------------------+
| Processes:                                                                  |
|  GPU   GI   CI        PID   Type   Process name                  GPU Memory |
|        ID   ID                                                   Usage      |
|=============================================================================|
|  No running processes found                                                 |
+-----------------------------------------------------------------------------+
Use UUID to assign GPU
Checking UUID is like the picture below. Suppose I wanna assign the MIG-GPU-946285fa-dcee-e236-0198-a703f324d8d4/1/0
nvidia-smi -L
For example:
user@gpua100:~$ nvidia-smi -L
GPU 0: A100-PCIE-40GB (UUID: GPU-b051e1e7-7531-b420-8827-892b063833d2)
GPU 1: A100-PCIE-40GB (UUID: GPU-562558c6-af26-bfe9-6c0c-4989f204bc73)
GPU 2: A100-PCIE-40GB (UUID: GPU-946285fa-dcee-e236-0198-a703f324d8d4)
  MIG 3g.20gb Device 0: (UUID: MIG-GPU-946285fa-dcee-e236-0198-a703f324d8d4/1/0)
  MIG 3g.20gb Device 1: (UUID: MIG-GPU-946285fa-dcee-e236-0198-a703f324d8d4/2/0)
GPU 3: A100-PCIE-40GB (UUID: GPU-5089e850-f2f8-507e-2a86-df4b29134540)
  MIG 3g.20gb Device 0: (UUID: MIG-GPU-5089e850-f2f8-507e-2a86-df4b29134540/1/0)
  MIG 3g.20gb Device 1: (UUID: MIG-GPU-5089e850-f2f8-507e-2a86-df4b29134540/2/0)
GPU 4: A100-PCIE-40GB (UUID: GPU-206796d0-5248-f36e-cf96-53d95965943d)
Then let's try the TensorRT image with the GPU resource.
Command:
docker run -it --rm --gpus '"device=MIG-GPU-946285fa-dcee-e236-0198-a703f324d8d4/1/0"' nvcr.io/nvidia/tensorrt:21.03-py3 bash
For example:
user@gpua100:~$ docker run -it --rm --gpus '"device=MIG-GPU-946285fa-dcee-e236-0198-a703f324d8d4/1/0"' nvcr.io/nvidia/tensorrt:21.03-py3 bash

=====================
== NVIDIA TensorRT ==
=====================

NVIDIA Release 21.03 (build 20572684)

NVIDIA TensorRT 7.2.2 (c) 2016-2021, NVIDIA CORPORATION.  All rights reserved.
Container image (c) 2021, NVIDIA CORPORATION.  All rights reserved.

https://developer.nvidia.com/tensorrt

This container image and its contents are governed by the NVIDIA Deep Learning Container License.
By pulling and using the container, you accept the terms and conditions of this license:
https://developer.nvidia.com/ngc/nvidia-deep-learning-container-license

To install Python sample dependencies, run /opt/tensorrt/python/python_setup.sh

To install the open-source samples corresponding to this TensorRT release version run /opt/tensorrt/install_opensource.sh.
To build the open source parsers, plugins, and samples for current top-of-tree on master or a different branch, run /opt/tensorrt/install_opensource.sh -b <branch>
See https://github.com/NVIDIA/TensorRT for more information.

root@f2a203b3dfb3:/workspace#
Check the status of GPU MIG.
root@f2a203b3dfb3:/workspace# nvidia-smi
Tue Aug 16 08:51:45 2022
+-----------------------------------------------------------------------------+
| NVIDIA-SMI 460.73.01    Driver Version: 460.73.01    CUDA Version: 11.2     |
|-------------------------------+----------------------+----------------------+
| GPU  Name        Persistence-M| Bus-Id        Disp.A | Volatile Uncorr. ECC |
| Fan  Temp  Perf  Pwr:Usage/Cap|         Memory-Usage | GPU-Util  Compute M. |
|                               |                      |               MIG M. |
|===============================+======================+======================|
|   0  A100-PCIE-40GB      On   | 00000000:44:00.0 Off |                   On |
| N/A   26C    P0    34W / 250W |                  N/A |     N/A      Default |
|                               |                      |              Enabled |
+-------------------------------+----------------------+----------------------+

+-----------------------------------------------------------------------------+
| MIG devices:                                                                |
+------------------+----------------------+-----------+-----------------------+
| GPU  GI  CI  MIG |         Memory-Usage |        Vol|         Shared        |
|      ID  ID  Dev |           BAR1-Usage | SM     Unc| CE  ENC  DEC  OFA  JPG|
|                  |                      |        ECC|                       |
|==================+======================+===========+=======================|
|  0    1   0   0  |  17919MiB / 20096MiB | 42      0 |  3   0    2    0    0 |
|                  |      4MiB / 32767MiB |           |                       |
+------------------+----------------------+-----------+-----------------------+

+-----------------------------------------------------------------------------+
| Processes:                                                                  |
|  GPU   GI   CI        PID   Type   Process name                  GPU Memory |
|        ID   ID                                                   Usage      |
|=============================================================================|
+-----------------------------------------------------------------------------+
Done~
Notes
Please check the "Persistence Mode".
Turn on
sudo nvidia-smi -pm 1
Turn off
sudo nvidia-smi -pm 0
For example,
+-----------------------------------------------------------------------------+
| NVIDIA-SMI 460.32.03    Driver Version: 460.32.03    CUDA Version: 11.2     |
|-------------------------------+----------------------+----------------------+
| GPU  Name        Persistence-M| Bus-Id        Disp.A | Volatile Uncorr. ECC |
| Fan  Temp  Perf  Pwr:Usage/Cap|         Memory-Usage | GPU-Util  Compute M. |
|                               |                      |               MIG M. |
|===============================+======================+======================|
|   0  Tesla K80           On   | 00000000:00:1E.0 Off |                    0 |
| N/A   41C    P8    29W / 149W |      0MiB / 11441MiB |      0%      Default |
|                               |                      |                  N/A |
+-------------------------------+----------------------+----------------------+
In this example, the Persistence-M column shows "On," indicating that persistence mode is enabled. If it shows "Off," it means that persistence mode is not enabled.