AGX Xavier
In this page, there is a detail record that how to set up the AGX from scratch. There are some packages or tools which should be installed.
In this installation, I was installing JetPack 4.4 and SDK Manager 1.1.0.6343.
Flash OS and install target components
Go to download the SDK manager.
Choose which one
target operating systemyou want to install. (JetPack version)Choose which components you want to install. (I suggest to select whole items.)
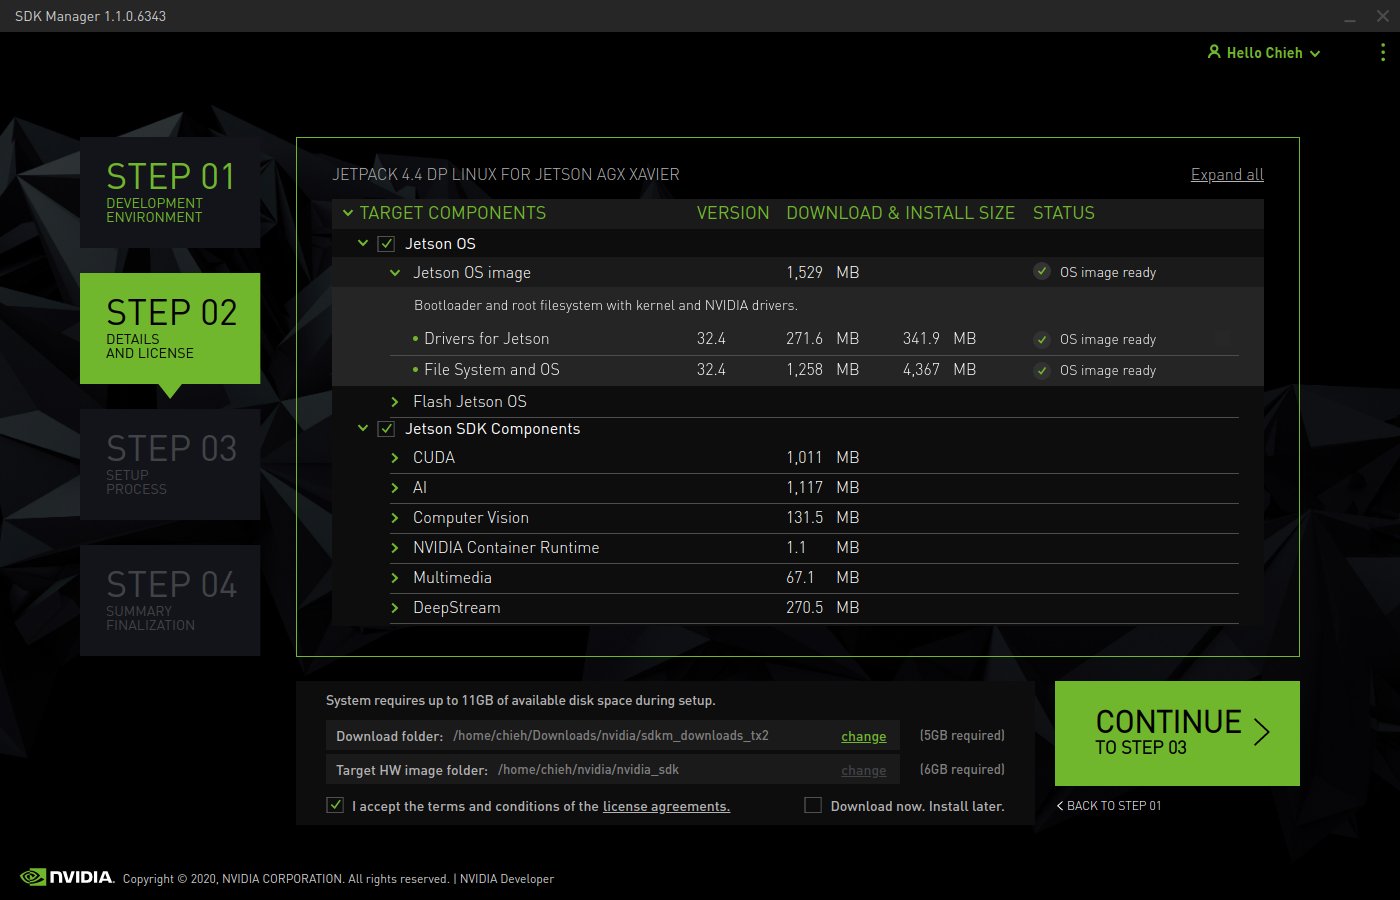 We can see that very detail information including version, size and item name.
Go to next step3 to start installing. When we start to download the packages and install. You might meet this prompt below that ask you to type the username and password.
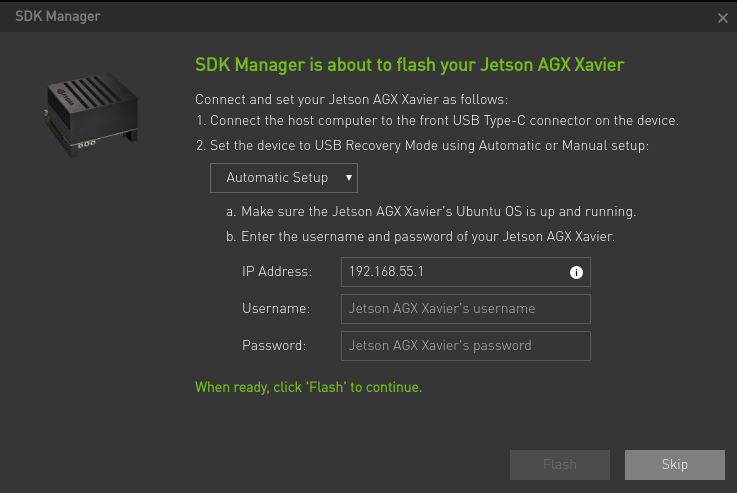
Press
POWER BUTTON→ PressRECOVERY BUTTOMover 3 seconds (Keep hold it) → PressRESET BUTTONand unclasp both at the same time. You have to login Jetson device to setup until your net can work well. On the other hand, in your host, please type this commandlsusbon your terminal and check whether there is aNVIDIA Corpin the list or not. (Remind: Only one type-c port can connect to PC. So if you cannot find theNVIDIA Corp, you can change to another type-c port.)Come back to step 3. Enter your AGX's username / pd, and then keep going to install.
Done.
After we flashed and installed all components, AGX remained the 16.7GB / 29.5GB space.
Reference:
Version Information
There are original versions after we installed the JetPack 4.4.
TensorRT : 7.1.0.16
Cmake : 3.10.2
git version 2.17.1
Python3 : 3.6.9
Switch the rootfs to a NVMe SSD
- Before we switch the rootfs to a SSD, we have to done the normal flashing steps.
- Format the SSD with
ext4and no need to mount the SSD. - Clone the scripts from rootOnNVMe.
- Run the
copy-rootfs-ssd.sh - Run the
setup-service.sh
In these scripts, basically it will help us to mount the SSD and move the folder to SSD. Also, it will set the startup by SSD.
Mount the SSD by a command
We can use lsblk to check whether the SSD disk exists or not.
sudo mount (the disk you want to mount) (destination location)
For example:
sudo mount /dev/nvme0n1p1 /mnt
zsh & oh-my-zsh
Commands:
sudo apt-get update
sudo apt-get upgrade
sudo apt-get install zsh
Use this to check.
cat /etc/shells
Output:
# /etc/shells: valid login shells
/bin/sh
/bin/bash
/bin/rbash
/bin/dash
/bin/zsh
/usr/bin/zsh
nvidia@nvidia-
Download the oh-my-zsh
sh -c "$(wget https://raw.githubusercontent.com/robbyrussell/oh-my-zsh/master/tools/install.sh -O -)"
Change the initial shell of login
chsh -s /bin/zsh
Change the theme
I like this theme, oh-my-zsh-bunnyruni-theme.
cd $ZSH_CUSTOM/themes/
git clone https://github.com/jopcode/oh-my-zsh-bunnyruni-theme.git
mv oh-my-zsh-bunnyruni-theme/bunnyruni.zsh-theme .
Set the theme in your ~/.zshrc file
ZSH_THEME="bunnyruni"`
Reference
VS code
As the Jetson device is ARM 64 machines, you should build the vs code from source.
git clone https://github.com/JetsonHacksNano/installVSCode.git
cd installVSCode
./installVSCode.sh
After installation, you can run VSCode by this command.
code-oss
Reference:
Install Plugins
- Better Comments
- Atom One Dark Theme
- Power Mode
- Python
- Material Icon Theme
- TODO Highlight
- Markdown All in One
Install Libraries
sudo apt-get install python3-pip
python3 -m pip install --upgrade pip setuptools wheel
sudo -H pip3 install jetson-stats
sudo apt-get update
sudo apt-get install -y build-essential libatlas-base-dev gfortran libfreetype6-dev python3-setuptools
sudo apt-get install -y protobuf-compiler libprotobuf-dev openssl libssl-dev libcurl4-openssl-dev

pip3 install matplotlib
Upgrade Cmake version
(original version is 3.10.2). Follow here.
cmake version 3.13.0
sudo wget http://www.cmake.org/files/v3.13/cmake-3.13.0.tar.gz
tar xpvf cmake-3.13.0.tar.gz cmake-3.13.0/
cd cmake-3.13.0/
sudo ./bootstrap --system-curl
sudo make -j8
echo 'export PATH=/home/nvidia/cmake-3.13.0/bin/:$PATH' >> ~/.zshrc
source ~/.zshrc
If you encounter the issue like below:
$ sudo ./bootstrap --system-curl
---------------------------------------------
CMake 3.13.0, Copyright 2000-2018 Kitware, Inc. and Contributors
Found GNU toolchain
C compiler on this system is: gcc
C++ compiler on this system is: g++
Makefile processor on this system is: make
g++ has setenv
g++ has unsetenv
g++ does not have environ in stdlib.h
g++ has stl wstring
g++ has <ext/stdio_filebuf.h>
---------------------------------------------
make: 'cmake' is up to date.
loading initial cache file /home/nvidia/cmake-3.13.0/Bootstrap.cmk/InitialCacheFlags.cmake
-- Using system-installed CURL
-- Using system-installed ZLIB
-- Could NOT find CURL (missing: CURL_LIBRARY CURL_INCLUDE_DIR)
CMake Error at CMakeLists.txt:404 (message):
  CMAKE_USE_SYSTEM_CURL is ON but a curl is not found!
Call Stack (most recent call first):
  CMakeLists.txt:685 (CMAKE_BUILD_UTILITIES)


-- Configuring incomplete, errors occurred!
See also "/home/nvidia/cmake-3.13.0/CMakeFiles/CMakeOutput.log".
See also "/home/nvidia/cmake-3.13.0/CMakeFiles/CMakeError.log".
---------------------------------------------
Error when bootstrapping CMake:
Problem while running initial CMake
---------------------------------------------
Solution:
sudo apt-get install libcurl4-openssl-dev
Install scipy
scipy version 1.3.3
wget https://github.com/scipy/scipy/releases/download/v1.3.3/scipy-1.3.3.tar.gz
tar -xzvf scipy-1.3.3.tar.gz scipy-1.3.3
cd scipy-1.3.3/
python3 setup.py install --user
Options
sudo apt autoremove
Install onnx
sudo apt-get install python3-pip libprotoc-dev protobuf-compiler
pip3 install onnx --verbose
Reference: From here
Install PyTorch
Please check this instructions.
You can also check my notes.
torch version 1.5.0
wget https://nvidia.box.com/shared/static/3ibazbiwtkl181n95n9em3wtrca7tdzp.whl -O torch-1.5.0-cp36-cp36m-linux_aarch64.whl
sudo -H python3 -m pip install Cython
sudo -H python3 -m pip install torch-1.5.0-cp36-cp36m-linux_aarch64.whl
sudo apt-get install python3-pip libopenblas-base libopenmpi-dev
Install torchvision
sudo apt-get install libjpeg-dev zlib1g-dev
git clone --branch <version> https://github.com/pytorch/vision torchvision
PyTorch v1.5 - torchvision v0.6.0
git clone --branch v0.6.0 https://github.com/pytorch/vision torchvision
cd torchvision
sudo -H python3 setup.py install
cd ..
sudo -H python3 -m pip install 'pillow<7'
It installed the version 6.2.2 of pillow in the end.
Update [2021/08/17]
Tried to install again with this version, but it could not work anymore.
Hence, I upgraded the version of Torch as v1.8.0 and TorchVersion as v0.9.0.
Steps for torch:
wget https://nvidia.box.com/shared/static/p57jwntv436lfrd78inwl7iml6p13fzh.whl -O torch-1.8.0-cp36-cp36m-linux_aarch64.whl
sudo apt-get install python3-pip libopenblas-base libopenmpi-dev
pip3 install Cython
pip3 install numpy torch-1.8.0-cp36-cp36m-linux_aarch64.whl
Steps for torchvision:
sudo apt-get install libjpeg-dev zlib1g-dev libpython3-dev libavcodec-dev libavformat-dev libswscale-dev
git clone --branch v0.9.0 https://github.com/pytorch/vision torchvision
cd torchvision
export BUILD_VERSION=0.9.0
python3 setup.py install --user
cd ../  # attempting to load torchvision from build dir will result in import error
pip install 'pillow<7' # always needed for Python 2.7, not needed torchvision v0.5.0+ with Python 3.6
Source: Check here
Install Onnxruntime
I followed from here.
git clone --single-branch --recursive --branch v1.1.2 https://github.com/Microsoft/onnxruntime
Important:
export CUDACXX="/usr/local/cuda/bin/nvcc"
To modify some places.
Modify  tools/ci_build/build.py
    - "-Donnxruntime_DEV_MODE=" + ("OFF" if args.android else "ON"),
    + "-Donnxruntime_DEV_MODE=" + ("OFF" if args.android else "OFF"),
Modify cmake/CMakeLists.txt
    -  set(CMAKE_CUDA_FLAGS "${CMAKE_CUDA_FLAGS} -gencode=arch=compute_50,code=sm_50") # M series
    +  set(CMAKE_CUDA_FLAGS "${CMAKE_CUDA_FLAGS} -gencode=arch=compute_53,code=sm_53") # Jetson support
    -  set(CMAKE_CUDA_FLAGS "${CMAKE_CUDA_FLAGS} -gencode=arch=compute_70,code=sm_70")
    +  set(CMAKE_CUDA_FLAGS "${CMAKE_CUDA_FLAGS} -gencode=arch=compute_72,code=sm_72") # AGX
If you only do it and build it, you might get this known error below.
/home/nvidia/onnxruntime/cmake/external/eigen/Eigen/src/Core/products/GeneralBlockPanelKernel.h:1148:71: warning: unused parameter ‘dest’ [-Wunused-parameter]
   EIGEN_STRONG_INLINE void updateRhs(const RhsScalar* b, RhsPacketx4& dest) const
                                                                       ^~~~
CMakeFiles/onnxruntime_providers_cuda.dir/build.make:465: recipe for target 'CMakeFiles/onnxruntime_providers_cuda.dir/home/nvidia/onnxruntime/onnxruntime/core/providers/cuda/rnn/cudnn_rnn_base.cc.o' failed
make[2]: *** [CMakeFiles/onnxruntime_providers_cuda.dir/home/nvidia/onnxruntime/onnxruntime/core/providers/cuda/rnn/cudnn_rnn_base.cc.o] Error 1
CMakeFiles/Makefile2:952: recipe for target 'CMakeFiles/onnxruntime_providers_cuda.dir/all' failed
make[1]: *** [CMakeFiles/onnxruntime_providers_cuda.dir/all] Error 2
Makefile:162: recipe for target 'all' failed
make: *** [all] Error 2
Traceback (most recent call last):
  File "/home/nvidia/onnxruntime/tools/ci_build/build.py", line 1043, in <module>
    sys.exit(main())
  File "/home/nvidia/onnxruntime/tools/ci_build/build.py", line 975, in main
    build_targets(cmake_path, build_dir, configs, args.parallel)
  File "/home/nvidia/onnxruntime/tools/ci_build/build.py", line 415, in build_targets
    run_subprocess(cmd_args)
  File "/home/nvidia/onnxruntime/tools/ci_build/build.py", line 197, in run_subprocess
    completed_process = subprocess.run(args, cwd=cwd, check=True, stdout=stdout, stderr=stderr, env=my_env, shell=shell)
  File "/usr/lib/python3.6/subprocess.py", line 438, in run
    output=stdout, stderr=stderr)
subprocess.CalledProcessError: Command '['/home/nvidia/cmake-3.13.0/bin/cmake', '--build', '/home/nvidia/onnxruntime/build/Linux/Release', '--config', 'Release']' returned non-zero exit status 2.
Please check here to modify the document.
Check here
Open the onnxruntime/onnxruntime/core/providers/cuda/rnn/cudnn_rnn_base.h file, and find at line 45.
    // CUDNN_RETURN_IF_ERROR(cudnnSetRNNDescriptor(cudnnHandle,
    //                                             cudnn_rnn_desc_,
    //                                             gsl::narrow_cast<int>(hidden_size),
    //                                             num_layers,
    //                                             cudnn_dropout_desc,
    //                                             CUDNN_LINEAR_INPUT,  // We can also skip the input matrix transformation
    //                                             cudnn_direction_model,
    //                                             rnn_mode,
    //                                             CUDNN_RNN_ALGO_STANDARD,  //CUDNN_RNN_ALGO_PERSIST_STATIC, CUDNN_RNN_ALGO_PERSIST_DYNAMIC
    //                                             dataType));
    CUDNN_RETURN_IF_ERROR(cudnnSetRNNDescriptor_v6(cudnnHandle,
                                                   cudnn_rnn_desc_,
                                                   gsl::narrow_cast<int>(hidden_size),
                                                   num_layers,
                                                   cudnn_dropout_desc,
                                                   CUDNN_LINEAR_INPUT,  // We can also skip the input matrix transformation
                                                   cudnn_direction_model,
                                                   rnn_mode,
                                                   CUDNN_RNN_ALGO_STANDARD,  //CUDNN_RNN_ALGO_PERSIST_STATIC, CUDNN_RNN_ALGO_PERSIST_DYNAMIC
                                                   dataType));
Save and quit it.
Start to build it.
sudo ./build.sh --config Release --update --build --build_wheel --use_tensorrt --cuda_home /usr/local/cuda --cudnn_home /usr/lib/aarch64-linux-gnu --tensorrt_home /usr/lib/aarch64-linux-gnu
Output:
Copying onnxruntime_gpu_tensorrt.egg-info to build/bdist.linux-aarch64/wheel/onnxruntime_gpu_tensorrt-1.1.2.data/purelib/onnxruntime_gpu_tensorrt-1.1.2-py3.6.egg-info
running install_scripts
creating build/bdist.linux-aarch64/wheel/onnxruntime_gpu_tensorrt-1.1.2.dist-info/WHEEL
creating 'dist/onnxruntime_gpu_tensorrt-1.1.2-cp36-cp36m-linux_aarch64.whl' and adding 'build/bdist.linux-aarch64/wheel' to it
adding 'onnxruntime_gpu_tensorrt-1.1.2.data/purelib/onnxruntime/LICENSE'
adding 'onnxruntime_gpu_tensorrt-1.1.2.data/purelib/onnxruntime/Privacy.md'
adding 'onnxruntime_gpu_tensorrt-1.1.2.data/purelib/onnxruntime/ThirdPartyNotices.txt'
adding 'onnxruntime_gpu_tensorrt-1.1.2.data/purelib/onnxruntime/__init__.py'
adding 'onnxruntime_gpu_tensorrt-1.1.2.data/purelib/onnxruntime/backend/__init__.py'
adding 'onnxruntime_gpu_tensorrt-1.1.2.data/purelib/onnxruntime/backend/backend.py'
adding 'onnxruntime_gpu_tensorrt-1.1.2.data/purelib/onnxruntime/backend/backend_rep.py'
adding 'onnxruntime_gpu_tensorrt-1.1.2.data/purelib/onnxruntime/capi/__init__.py'
adding 'onnxruntime_gpu_tensorrt-1.1.2.data/purelib/onnxruntime/capi/_ld_preload.py'
adding 'onnxruntime_gpu_tensorrt-1.1.2.data/purelib/onnxruntime/capi/_pybind_state.py'
adding 'onnxruntime_gpu_tensorrt-1.1.2.data/purelib/onnxruntime/capi/onnxruntime_pybind11_state.so'
adding 'onnxruntime_gpu_tensorrt-1.1.2.data/purelib/onnxruntime/capi/onnxruntime_validation.py'
adding 'onnxruntime_gpu_tensorrt-1.1.2.data/purelib/onnxruntime/capi/session.py'
adding 'onnxruntime_gpu_tensorrt-1.1.2.data/purelib/onnxruntime/datasets/__init__.py'
adding 'onnxruntime_gpu_tensorrt-1.1.2.data/purelib/onnxruntime/datasets/logreg_iris.onnx'
adding 'onnxruntime_gpu_tensorrt-1.1.2.data/purelib/onnxruntime/datasets/mul_1.onnx'
adding 'onnxruntime_gpu_tensorrt-1.1.2.data/purelib/onnxruntime/datasets/sigmoid.onnx'
adding 'onnxruntime_gpu_tensorrt-1.1.2.data/purelib/onnxruntime/tools/__init__.py'
adding 'onnxruntime_gpu_tensorrt-1.1.2.data/purelib/onnxruntime/tools/onnxruntime_test.py'
adding 'onnxruntime_gpu_tensorrt-1.1.2.dist-info/METADATA'
adding 'onnxruntime_gpu_tensorrt-1.1.2.dist-info/WHEEL'
adding 'onnxruntime_gpu_tensorrt-1.1.2.dist-info/entry_points.txt'
adding 'onnxruntime_gpu_tensorrt-1.1.2.dist-info/top_level.txt'
adding 'onnxruntime_gpu_tensorrt-1.1.2.dist-info/RECORD'
removing build/bdist.linux-aarch64/wheel
2020-06-09 21:49:04,747 Build [DEBUG] - Subprocess completed. Return code=0
2020-06-09 21:49:04,749 Build [INFO] - Build complete
Check files and install .whl
Command:
$ ls -l build/Linux/Release/*.so

-rwxrwxr-x 1 nvidia nvidia    44392     9 17:13 build/Linux/Release/libcustom_op_library.so
-rwxrwxr-x 1 nvidia nvidia 66185368     9 21:46 build/Linux/Release/onnxruntime_pybind11_state.so

$ ls -l build/Linux/Release/dist/*.whl

-rw-rw-r-- 1 nvidia nvidia 15594036     9 21:49 build/Linux/Release/dist/onnxruntime_gpu_tensorrt-1.1.2-cp36-cp36m-linux_aarch64.whl

$ sudo -H python3 -m pip install ./build/Linux/Release/dist/onnxruntime_gpu_tensorrt-1.1.2-cp36-cp36m-linux_aarch64.whl

Processing ./build/Linux/Release/dist/onnxruntime_gpu_tensorrt-1.1.2-cp36-cp36m-linux_aarch64.whl
Installing collected packages: onnxruntime-gpu-tensorrt
Successfully installed onnxruntime-gpu-tensorrt-1.1.2
Check it on python3. You can follow here.
$ python3

Python 3.6.9 (default, Apr 18 2020, 01:56:04)
[GCC 8.4.0] on linux
Type "help", "copyright", "credits" or "license" for more information.
>>> import onnxruntime
>>> onnxruntime.__version__
'1.1.2'
Done
NOTE: Make sure the onnxruntime version which can support the TensorRT version.
For TensorRT v7.0 up , it needs to use the onnxruntime v1.2.0 up.
Source : https://github.com/microsoft/onnxruntime/blob/v1.6.0/BUILD.md#nvidia-jetson-tx1tx2nanoxavier
git clone --recursive https://github.com/microsoft/onnxruntime

export CUDACXX="/usr/local/cuda/bin/nvcc"

sudo apt install -y --no-install-recommends   build-essential software-properties-common libopenblas-dev   libpython3.6-dev python3-pip python3-dev python3-setuptools python3-wheel

./build.sh --config Release --update --build --parallel --build_wheel \
--use_tensorrt --cuda_home /usr/local/cuda --cudnn_home /usr/lib/aarch64-linux-gnu \
--tensorrt_home /usr/lib/aarch64-linux-gnu

sudo -H python3 -m pip install ./build/Linux/Release/dist/onnxruntime_gpu_tensorrt-1.7.0-cp36-cp36m-linux_aarch64.whl
Test it:
Python 3.6.9 (default, Jan 26 2021, 15:33:00)
[GCC 8.4.0] on linux
Type "help", "copyright", "credits" or "license" for more information.
>>> import onnxruntime
>>>
Done~
This method also works for python3.8 on Ubuntu 20.04
Troubleshooting
The error happens during the building stage
About : CMAKE_CUDA_COMPILER
more
DCUDA_CUDA_LIBRARY=/usr/local/cuda/lib64/stubs', '-Donnxruntime_PYBIND_EXPORT_OPSCHEMA=OFF', '-DCMAKE_BUILD_TYPE=Release']
-- The CUDA compiler identification is unknown
CMake Error at CMakeLists.txt:612 (enable_language):
  No CMAKE_CUDA_COMPILER could be found.

  Tell CMake where to find the compiler by setting either the environment
  variable "CUDACXX" or the CMake cache entry CMAKE_CUDA_COMPILER to the full
  path to the compiler, or to the compiler name if it is in the PATH.
Solution
Check here
Open the file, /etc/environment, and add this line:
CUDACXX=/usr/local/cuda/bin/nvcc
Then you can try again~
Expand the SSD
Please check my video.
The configuration was GIGABYTE SSD 256GB NVMe M.2 2280.
Install Onnx2trt
Source from here; however, as the JetPack is different with previous what I installed, so I modified some places.
Command:
git clone https://github.com/onnx/onnx-tensorrt.git && cd onnx-tensorrt
git submodule update --init --recursive
cmake . -DCUDA_INCLUDE_DIRS=/usr/local/cuda/include -DTENSORRT_ROOT=/usr/src/tensorrt
make
sudo make install
Install Pycuda
Install requirements
sudo apt-get install -y build-essential python3-dev
sudo apt-get install -y libboost-python-dev libboost-thread-dev
sudo -H python3 -m pip install setuptools
Run this file. (Comment the lines from 7 to 10.
Output:
[SKIP]

Using /home/nvidia/.local/lib/python3.6/site-packages
Searching for numpy==1.13.3
Best match: numpy 1.13.3
Adding numpy 1.13.3 to easy-install.pth file

Using /usr/lib/python3/dist-packages
Searching for six==1.11.0
Best match: six 1.11.0
Adding six 1.11.0 to easy-install.pth file

Using /usr/lib/python3/dist-packages
Finished processing dependencies for pycuda==2019.1.2
~/ssd256/github/tensorrt_demos/ssd
pycuda version: (2019, 1, 2)
Done
torch version 2019.1.2
Install Opencv for python
Basically we have two ways to install opencv in Jetson devices.
First one is using pip to install and it can be suitable for a majority of situations.
python3 -m pip install opencv-python==4.3.0.38 opencv-python-headless==4.3.0.38
Work with the numpy v1.19.2
Sometimes you will meet some errors that you might need to install some libraries and you can try these commands below:
sudo apt-get update -y && sudo apt-get install -y libgl1-mesa-dev libglib2.0-0
Some version will encounter crash; hence, you can downgrade the version. (from versions: 3.4.10.37, 3.4.11.39, 3.4.11.41, 3.4.11.43, 3.4.11.45, 3.4.13.47, 4.3.0.38, 4.4.0.40, 4.4.0.42, 4.4.0.44, 4.4.0.46, 4.5.1.48)
Second way is to install from scoure. Please check this post
Setup Ubuntu 20.04 with Python 3.8 on Jetson devices
Here is another different environment for Jetson devices.
(The manipulation was in the container of jetson devices.)
Environment info:
- OS : Ubuntu 20.04 based on JetPack 4.4
- Python : 3.8
Introduction
Here are my successful steps of installing Pytorch and TorchVision by Python3.8 on Ubuntu 20.04 (in the container) on AGX / NX devices.
For the Pytorch part, I referred to this comment and it can work well in my environment. However, it didn’t mention how to install the Torchvision part. Hence, you can try to use these commands to install torchvision.
The steps of building pytorch v1.7
git clone --recursive --branch 1.7 http://github.com/pytorch/pytorch
cd pytorch
python3.8 -m pip install -r requirements.txt
python3.8 setup.py install
The building time will take almost over 6 hours on arm devices.
Here are my partial outputs.
byte-compiling /usr/local/lib/python3.8/dist-packages/caffe2/proto/hsm_pb2.py to hsm_pb2.cpython-38.pyc
byte-compiling /usr/local/lib/python3.8/dist-packages/caffe2/proto/torch_pb2.py to torch_pb2.cpython-38.pyc
byte-compiling /usr/local/lib/python3.8/dist-packages/caffe2/proto/caffe2_legacy_pb2.py to caffe2_legacy_pb2.cpython-38.pyc
byte-compiling /usr/local/lib/python3.8/dist-packages/caffe2/proto/metanet_pb2.py to metanet_pb2.cpython-38.pyc
byte-compiling /usr/local/lib/python3.8/dist-packages/caffe2/proto/caffe2_pb2.py to caffe2_pb2.cpython-38.pyc
running install_egg_info
running egg_info
writing torch.egg-info/PKG-INFO
writing dependency_links to torch.egg-info/dependency_links.txt
writing entry points to torch.egg-info/entry_points.txt
writing requirements to torch.egg-info/requires.txt
writing top-level names to torch.egg-info/top_level.txt
reading manifest file 'torch.egg-info/SOURCES.txt'
writing manifest file 'torch.egg-info/SOURCES.txt'
removing '/usr/local/lib/python3.8/dist-packages/torch-1.7.0a0.egg-info' (and everything under it)
Copying torch.egg-info to /usr/local/lib/python3.8/dist-packages/torch-1.7.0a0.egg-info
running install_scripts
Installing convert-caffe2-to-onnx script to /usr/local/bin
Installing convert-onnx-to-caffe2 script to /usr/local/bin
And test in other places.
The steps of building torchvision (should be with v0.8)
The cuda version is 10.2.
export CUDA_HOME=/usr/local/cuda
export LD_LIBRARY_PATH=$LD_LIBRARY_PATH:/usr/local/cuda/lib64:/usr/local/cuda/extras/CUPTI/lib64
export PATH=$PATH:$CUDA_HOME/bin

sudo apt-get install libjpeg-dev zlib1g-dev
git clone https://github.com/pytorch/vision.git
git checkout v0.8.1-rc1
sudo -H python3 setup.py install
Done.
Test it:
Note: That one was installed in the container. My host of the jetson device was still OS 18.04 and python 3.6. (JetPack v4.4)
Build a container for deep learning on AGX devices
If you wanna work in the container, you can build from my dockerfile. Basically the image was already installed the packages about the environment of deep learning use.
Commands
- Build images
docker build -t ai-container/l4t-ml:4.4 .
- Run it and exec it
docker run -idt --gpus all -p 5000:5000 -p 8501:8501 --name=ai-container l4t-ml:4.4
docker exec -ti ai-container /bin/bash
The default numpy version is numpy (1.19.2).
The based image is from nvcr.io/nvidia/l4t-ml:r32.4.4-py3.
Troubleshooting
If you encounter the connection failed issue, please change the source from here:
sudo sed -i'' 's/ports\.ubuntu\.com\/ubuntu-ports/free\.nchc\.org\.tw\/ubuntu-ports/' /etc/apt/sources.list
Install OpenCV
$ pip3 install opencv-python opencv-python-headless
Collecting opencv-python
  Using cached https://files.pythonhosted.org/packages/bb/08/9dbc183a3ac6baa95fabf749ddb531bd26256edfff5b6c2195eca26258e9/opencv-python-4.5.1.48.tar.gz
    Complete output from command python setup.py egg_info:
    Traceback (most recent call last):
      File "<string>", line 1, in <module>
      File "/tmp/pip-build-lj14vll6/opencv-python/setup.py", line 10, in <module>
        import skbuild
    ModuleNotFoundError: No module named 'skbuild'

    ----------------------------------------
Command "python setup.py egg_info" failed with error code 1 in /tmp/pip-build-lj14vll6/opencv-python/
No skbuild then trying to install this module, but it cannot find.
$ pip3 install skbuild
Collecting skbuild
Exception:
Traceback (most recent call last):
  File "/usr/lib/python3/dist-packages/pip/basecommand.py", line 215, in main
    status = self.run(options, args)
  File "/usr/lib/python3/dist-packages/pip/commands/install.py", line 353, in run
    wb.build(autobuilding=True)
  File "/usr/lib/python3/dist-packages/pip/wheel.py", line 749, in build
    self.requirement_set.prepare_files(self.finder)
  File "/usr/lib/python3/dist-packages/pip/req/req_set.py", line 380, in prepare_files
    ignore_dependencies=self.ignore_dependencies))
  File "/usr/lib/python3/dist-packages/pip/req/req_set.py", line 554, in _prepare_file
    require_hashes
  File "/usr/lib/python3/dist-packages/pip/req/req_install.py", line 278, in populate_link
    self.link = finder.find_requirement(self, upgrade)
  File "/usr/lib/python3/dist-packages/pip/index.py", line 465, in find_requirement
    all_candidates = self.find_all_candidates(req.name)
  File "/usr/lib/python3/dist-packages/pip/index.py", line 423, in find_all_candidates
    for page in self._get_pages(url_locations, project_name):
  File "/usr/lib/python3/dist-packages/pip/index.py", line 568, in _get_pages
    page = self._get_page(location)
  File "/usr/lib/python3/dist-packages/pip/index.py", line 683, in _get_page
    return HTMLPage.get_page(link, session=self.session)
  File "/usr/lib/python3/dist-packages/pip/index.py", line 795, in get_page
    resp.raise_for_status()
  File "/usr/share/python-wheels/requests-2.18.4-py2.py3-none-any.whl/requests/models.py", line 935, in raise_for_status
    raise HTTPError(http_error_msg, response=self)
requests.exceptions.HTTPError: 404 Client Error: Not Found for url: https://pypi.org/simple/skbuild/
Hence, we tried to upgrade the pip tool.
$ python3 -m pip install --upgrade pip
Collecting pip
  Downloading https://files.pythonhosted.org/packages/fe/ef/60d7ba03b5c442309ef42e7d69959f73aacccd0d86008362a681c4698e83/pip-21.0.1-py3-none-any.whl (1.5MB)
    100% |################################| 1.5MB 705kB/s
Installing collected packages: pip
  Found existing installation: pip 9.0.1
    Not uninstalling pip at /usr/lib/python3/dist-packages, outside environment /usr
Successfully installed pip-21.0.1
Then tried again. But it cannot find.
$ pip3 install skbuild
WARNING: pip is being invoked by an old script wrapper. This will fail in a future version of pip.
Please see https://github.com/pypa/pip/issues/5599 for advice on fixing the underlying issue.
To avoid this problem you can invoke Python with '-m pip' instead of running pip directly.
ERROR: Could not find a version that satisfies the requirement skbuild
ERROR: No matching distribution found for skbuild
Hence, we changed to inst`.
$ pip3 install scikit-build
WARNING: pip is being invoked by an old script wrapper. This will fail in a future version of pip.
Please see https://github.com/pypa/pip/issues/5599 for advice on fixing the underlying issue.
To avoid this problem you can invoke Python with '-m pip' instead of running pip directly.
Collecting scikit-build
  Downloading scikit_build-0.11.1-py2.py3-none-any.whl (72 kB)
     |################################| 72 kB 537 kB/s
Requirement already satisfied: wheel>=0.29.0 in /usr/local/lib/python3.6/dist-packages (from scikit-build) (0.35.1)
Requirement already satisfied: packaging in /usr/local/lib/python3.6/dist-packages (from scikit-build) (20.4)
Collecting distro
  Downloading distro-1.5.0-py2.py3-none-any.whl (18 kB)
Requirement already satisfied: setuptools>=28.0.0 in /usr/local/lib/python3.6/dist-packages (from scikit-build) (50.3.2)
Requirement already satisfied: pyparsing>=2.0.2 in /usr/lib/python3/dist-packages (from packaging->scikit-build) (2.2.0)
Requirement already satisfied: six in /usr/local/lib/python3.6/dist-packages (from packaging->scikit-build) (1.15.0)
Installing collected packages: distro, scikit-build
Successfully installed distro-1.5.0 scikit-build-0.11.1
Installed again:
$ pip3 install opencv-python==4.3.0.38
WARNING: pip is being invoked by an old script wrapper. This will fail in a future version of pip.
Please see https://github.com/pypa/pip/issues/5599 for advice on fixing the underlying issue.
To avoid this problem you can invoke Python with '-m pip' instead of running pip directly.
Collecting opencv-python==4.3.0.38
  Using cached opencv-python-4.3.0.38.tar.gz (88.0 MB)
  Installing build dependencies ... done
  Getting requirements to build wheel ... done
    Preparing wheel metadata ... done
Done.
Illegal instruction (core dumped) because of VERSION
When we imported the numpy, it encountered the Illegal instruction (core dumped) issue.
Python 3.6.9 (default, Oct  8 2020, 12:12:24)
[GCC 8.4.0] on linux
Type "help", "copyright", "credits" or "license" for more information.
>>> import numpy
`Illegal instruction (core dumped)`
Check the version, the numpy version is 1.19.5 which this one is quite new.
Hence, we uninstall it, and install 1.16.0 version again.
python3 -m pip uninstall numpy && python3 -m pip install numpy==1.16.0
Test:
Python 3.6.9 (default, Oct  8 2020, 12:12:24)
[GCC 8.4.0] on linux
Type "help", "copyright", "credits" or "license" for more information.
>>> import numpy
>>> exit()
Dockerfile
From nvcr.io/nvidia/l4t-ml:r32.4.4-py3

RUN python3 -m pip install flask flask_cors

RUN apt-get update && apt-get install -y ca-certificates wget sudo protobuf-compiler \
libprotobuf-dev python3-pip curl vim zip libsm6 libxext6 libxrender-dev python3-tk \
build-essential libatlas-base-dev gfortran libfreetype6-dev python3-setuptools protobuf-compiler libcurl4-openssl-dev


### Install cmake (Need to install libcurl4-openssl-dev)
WORKDIR /home/ai_container
RUN sudo wget http://www.cmake.org/files/v3.13/cmake-3.13.0.tar.gz && tar xpvf cmake-3.13.0.tar.gz cmake-3.13.0/ && cd cmake-3.13.0/ && sudo ./bootstrap --system-curl && sudo make -j8 && echo 'export PATH=/home/ai_container/cmake-3.13.0/bin/:$PATH' >> ~/.bashrc && source ~/.bashrc

RUN python3 -m pip install --upgrade pip setuptools wheel && sudo -H pip3 install jetson-stats

### Install cv2 with numpy 1.19.2
RUN python3 -m pip install opencv-python==4.3.0.38 opencv-python-headless==4.3.0.38

### Build onnxruntime
# Requiremnet:
RUN sudo apt install -y --no-install-recommends \
  build-essential software-properties-common libopenblas-dev \
  libpython3.6-dev python3-pip python3-dev python3-setuptools python3-wheel

# This one is installed the onnxruntime v1.6.0
RUN git clone --recursive https://github.com/microsoft/onnxruntime && export CUDACXX="/usr/local/cuda/bin/nvcc" && cd onnxruntime &&
./build.sh --config Release --update --build --parallel --build_wheel \
--use_tensorrt --cuda_home /usr/local/cuda --cudnn_home /usr/lib/aarch64-linux-gnu \
--tensorrt_home /usr/lib/aarch64-linux-gnu && sudo -H python3 -m pip install ./build/Linux/Release/dist/onnxruntime_gpu_tensorrt-1.7.0-cp36-cp36m-linux_aarch64.whl