Gitlab CI pipeline for deep learning
Introduction
Using CI mechanism can highly reduce developers' time that it can achieve building code, generating files, and testing your codes.
In this repository, I will demonstrate how to do it from scratch and take it on deep learning domain.
To avoid a beginner feeling that is a high learning threshold, I will introduce its workflow and some concepts that will make you more familiar with it.
The workflow of manipulating CI:
Mainly we can separate two parts:
- first part is creating runner and set up runner.
- Second part is to write the CI script like defining your testing / building workflow.
* runner: like a machine, like a people, like an executor, like a worker.
Notes:
- Gitlab server and Gitlab runner can be set in different devices.
- Gitlab runner can support various OS versions including Linux, MacOS, WIN, etc. It depends on your purpose. Documents
- Suppose the OS of your device is Linux, you can only deploy linux runner on your device and you cannot deploy the Windows runner.
- We can create a lot of runners, and we use
tagsto control the runner. Each runner can only do one thing at the same time; hence, if you have many tasks or repositories, it is better if you can make more runners. - Shared runner can use on different repositories, but Specific runner can only use on one repository.
Getting Started
- Simple steps : The purpose is to let you complete once CI process including creating a runner and test it by this runner. It is very simple. (I also demonstrated how to install and set up a windows runner.)
- Advanced CI Rule Mechanism: To set only using CI in the specific branch. We won't own only one branch in a majority of situations for AI developments.
- Connect
buildandteststages: How to connect multi-stages during CI mechanism and export the files from CI stages. - Use GPU in the CI stage: Enable GPU in docker containers during CI testing for deep learning (including Linux and Windows setup)
Simple Steps
(The steps and commands were followed from [1] and [2] of Reference area.)
Create a runner.
Please define the location of your config.
docker run --rm -t -i -v /path/to/config:/etc/gitlab-runner --name gitlab-runner gitlab/gitlab-runner registerHere is my example.

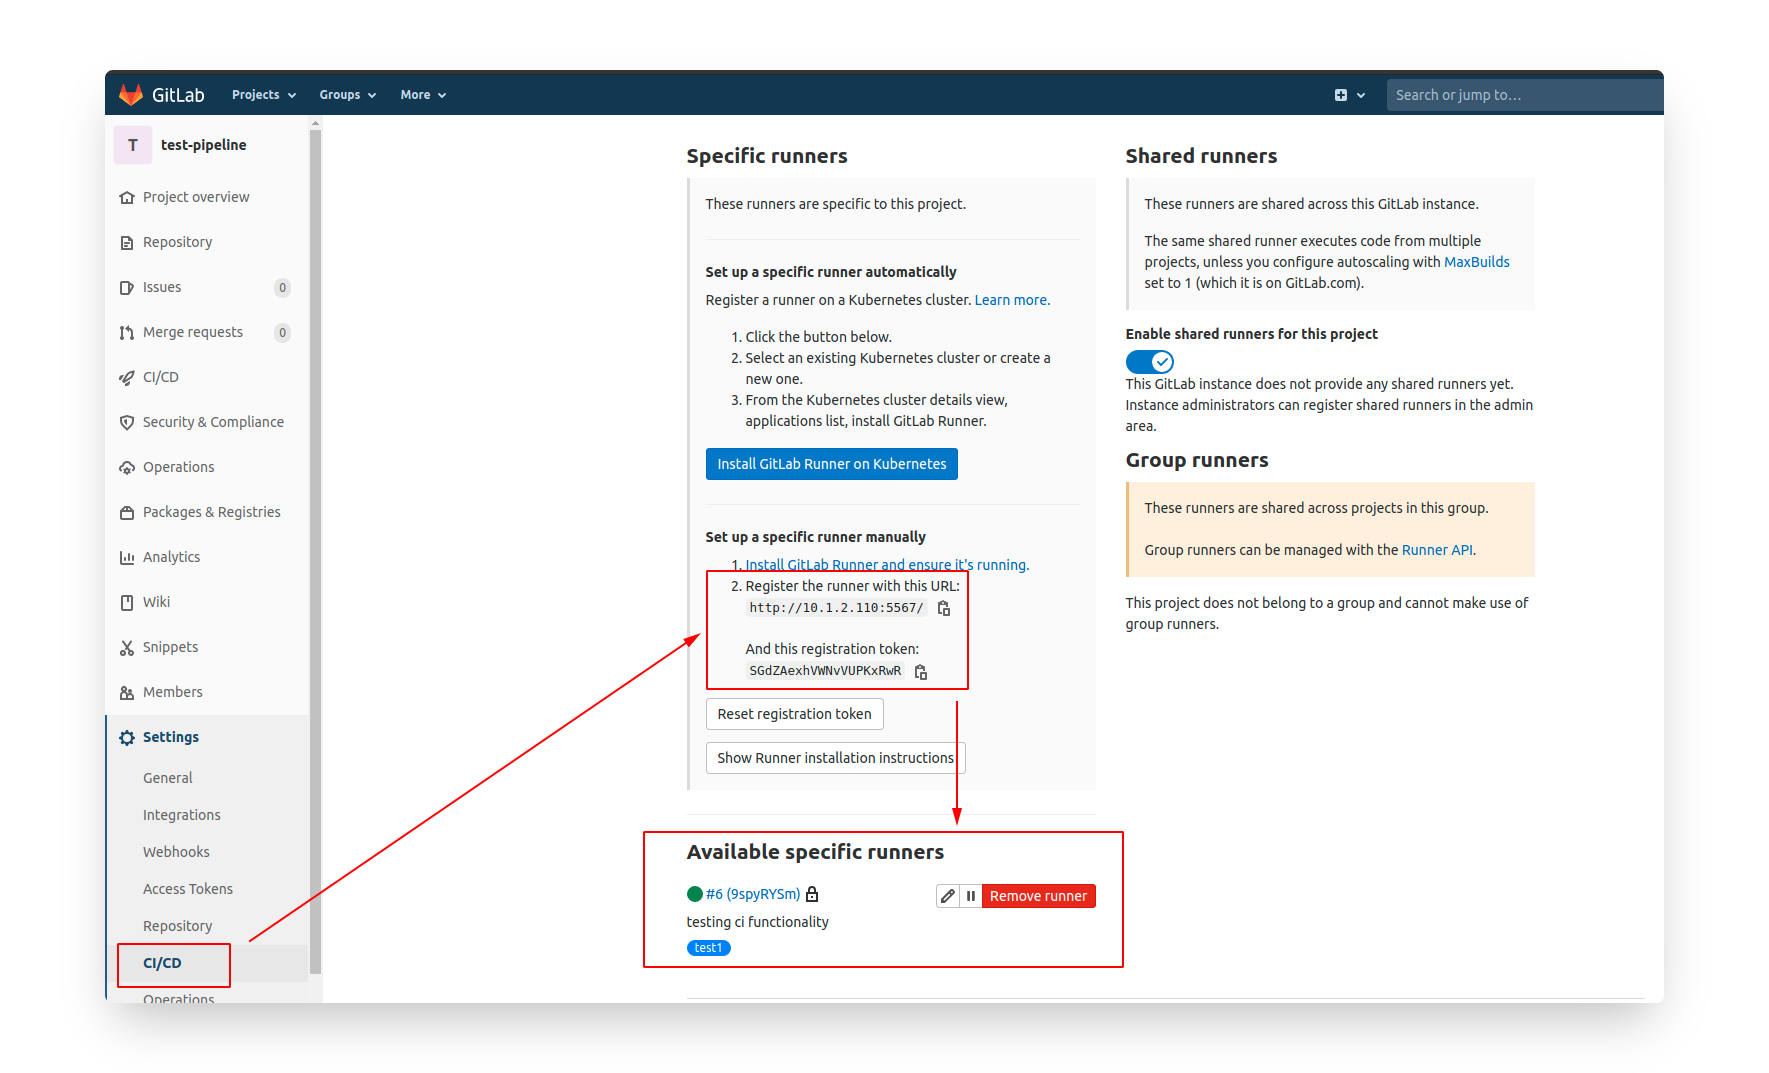
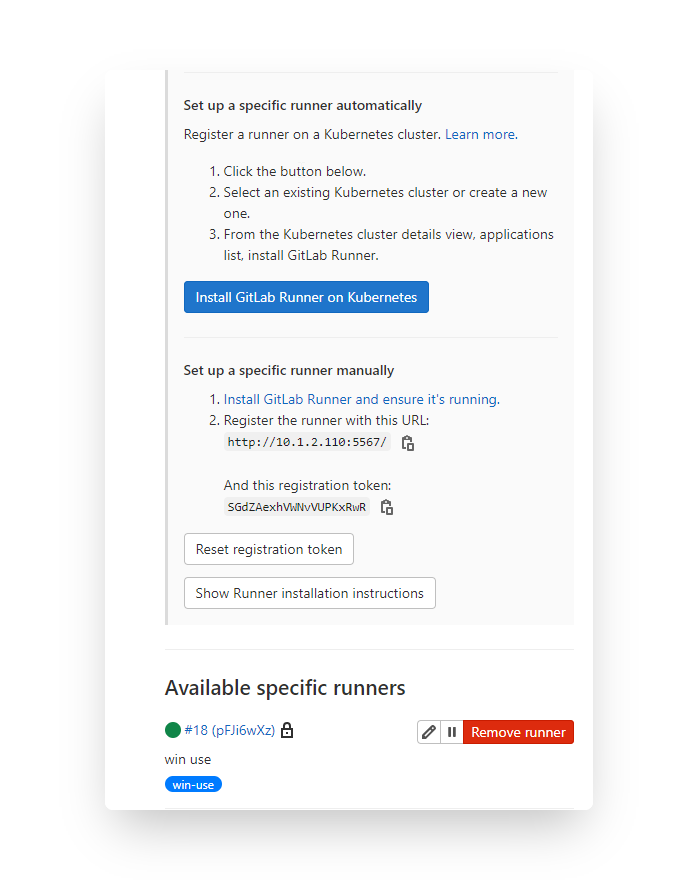
Check the "Set up a specific runner manually" area.
$ docker run --rm -t -i -v /test-pipeline/config:/etc/gitlab-runner --name gitlab-runner gitlab/gitlab-runner register

Runtime platform                                    arch=amd64 os=linux pid=6 revision=8925d9a0 version=14.1.0
Running in system-mode.

Enter the GitLab instance URL (for example, https://gitlab.com/):
http://10.1.2.110:5567/
Enter the registration token:
SGdZAexhVWNvVUPKxRwR
Enter a description for the runner:
[aa8c8bee8ea6]: testing ci functionality
Enter tags for the runner (comma-separated):
test1
Registering runner... succeeded                     runner=SGdZAexh
Enter an executor: custom, docker, parallels, shell, ssh, docker+machine, docker-ssh, virtualbox, docker-ssh+machine, kubernetes:
docker
Enter the default Docker image (for example, ruby:2.6):
node:8.9-alpine
Runner registered successfully. Feel free to start it, but if it's running already the config should be automatically reloaded!
Done of registered runner only, and then let's start the runner.
Please change your path of config folder.
test-pipeline ›› docker run -d --name gitlab-runner --restart always \
-v /test-pipeline/config:/etc/gitlab-runner \
-v /var/run/docker.sock:/var/run/docker.sock \
gitlab/gitlab-runner:latest
d217fc88273f841a9743f97056468c3cc6f91d0d7f5f91d1dee2fd0ceec0bb3d
Let's go back to Gitlab repo page that we can see there is a runner.
Done of setting the runner.
Second part is to create a script for gitlab-ci use. You can define exact commands inside this script.
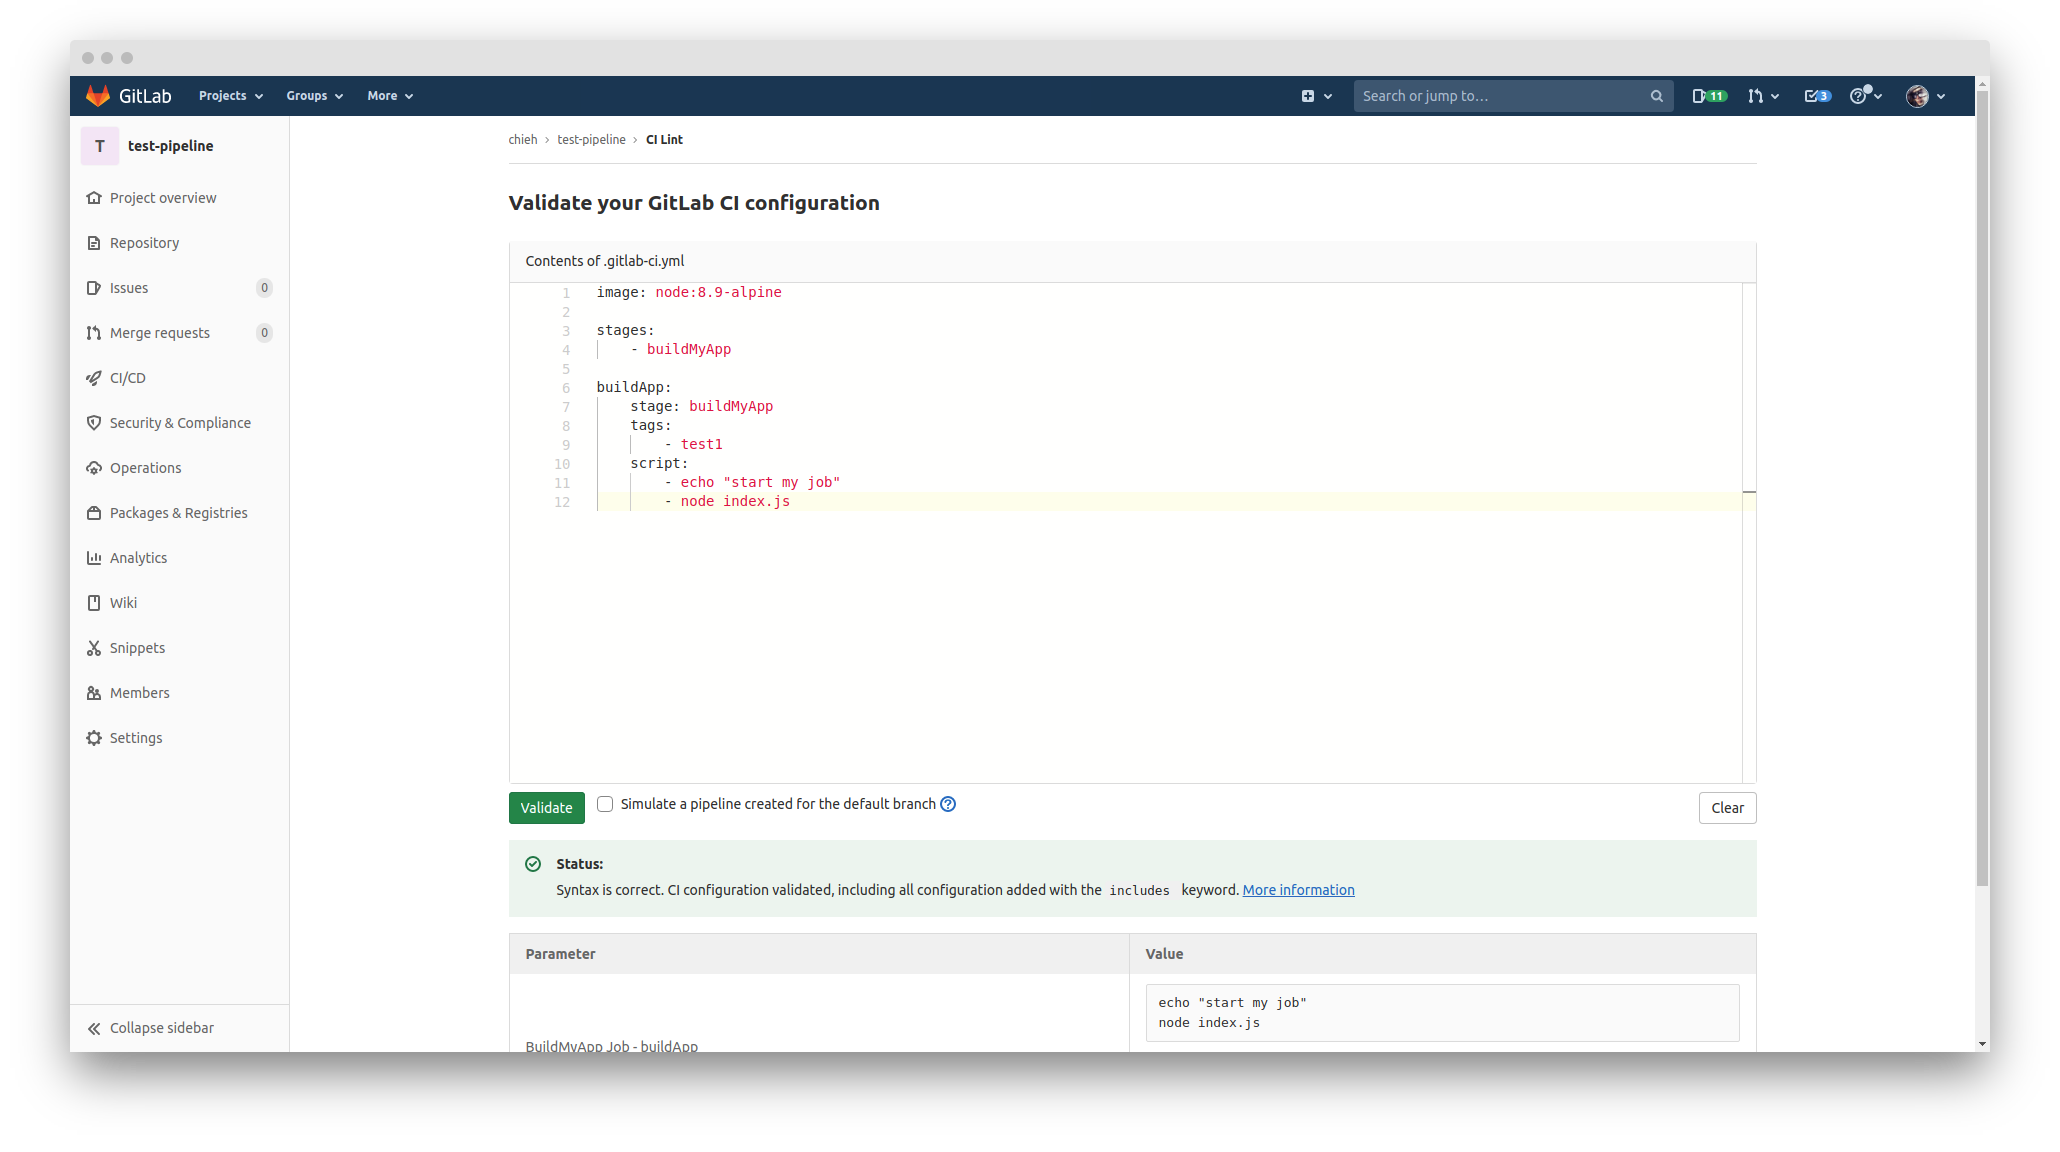
Create a
.gitlab-ci.yamlscript:image: node:8.9-alpine
stages:
- buildMyApp
buildApp:
stage: buildMyApp
tags:
- test1
script:
- echo "start my job"
- node index.js(If you create this scirpt in host, then you add this script and commit & push it.) Then we can go to CI/CD area to run pipeline. We can click it and check in the job to see the whole processes.
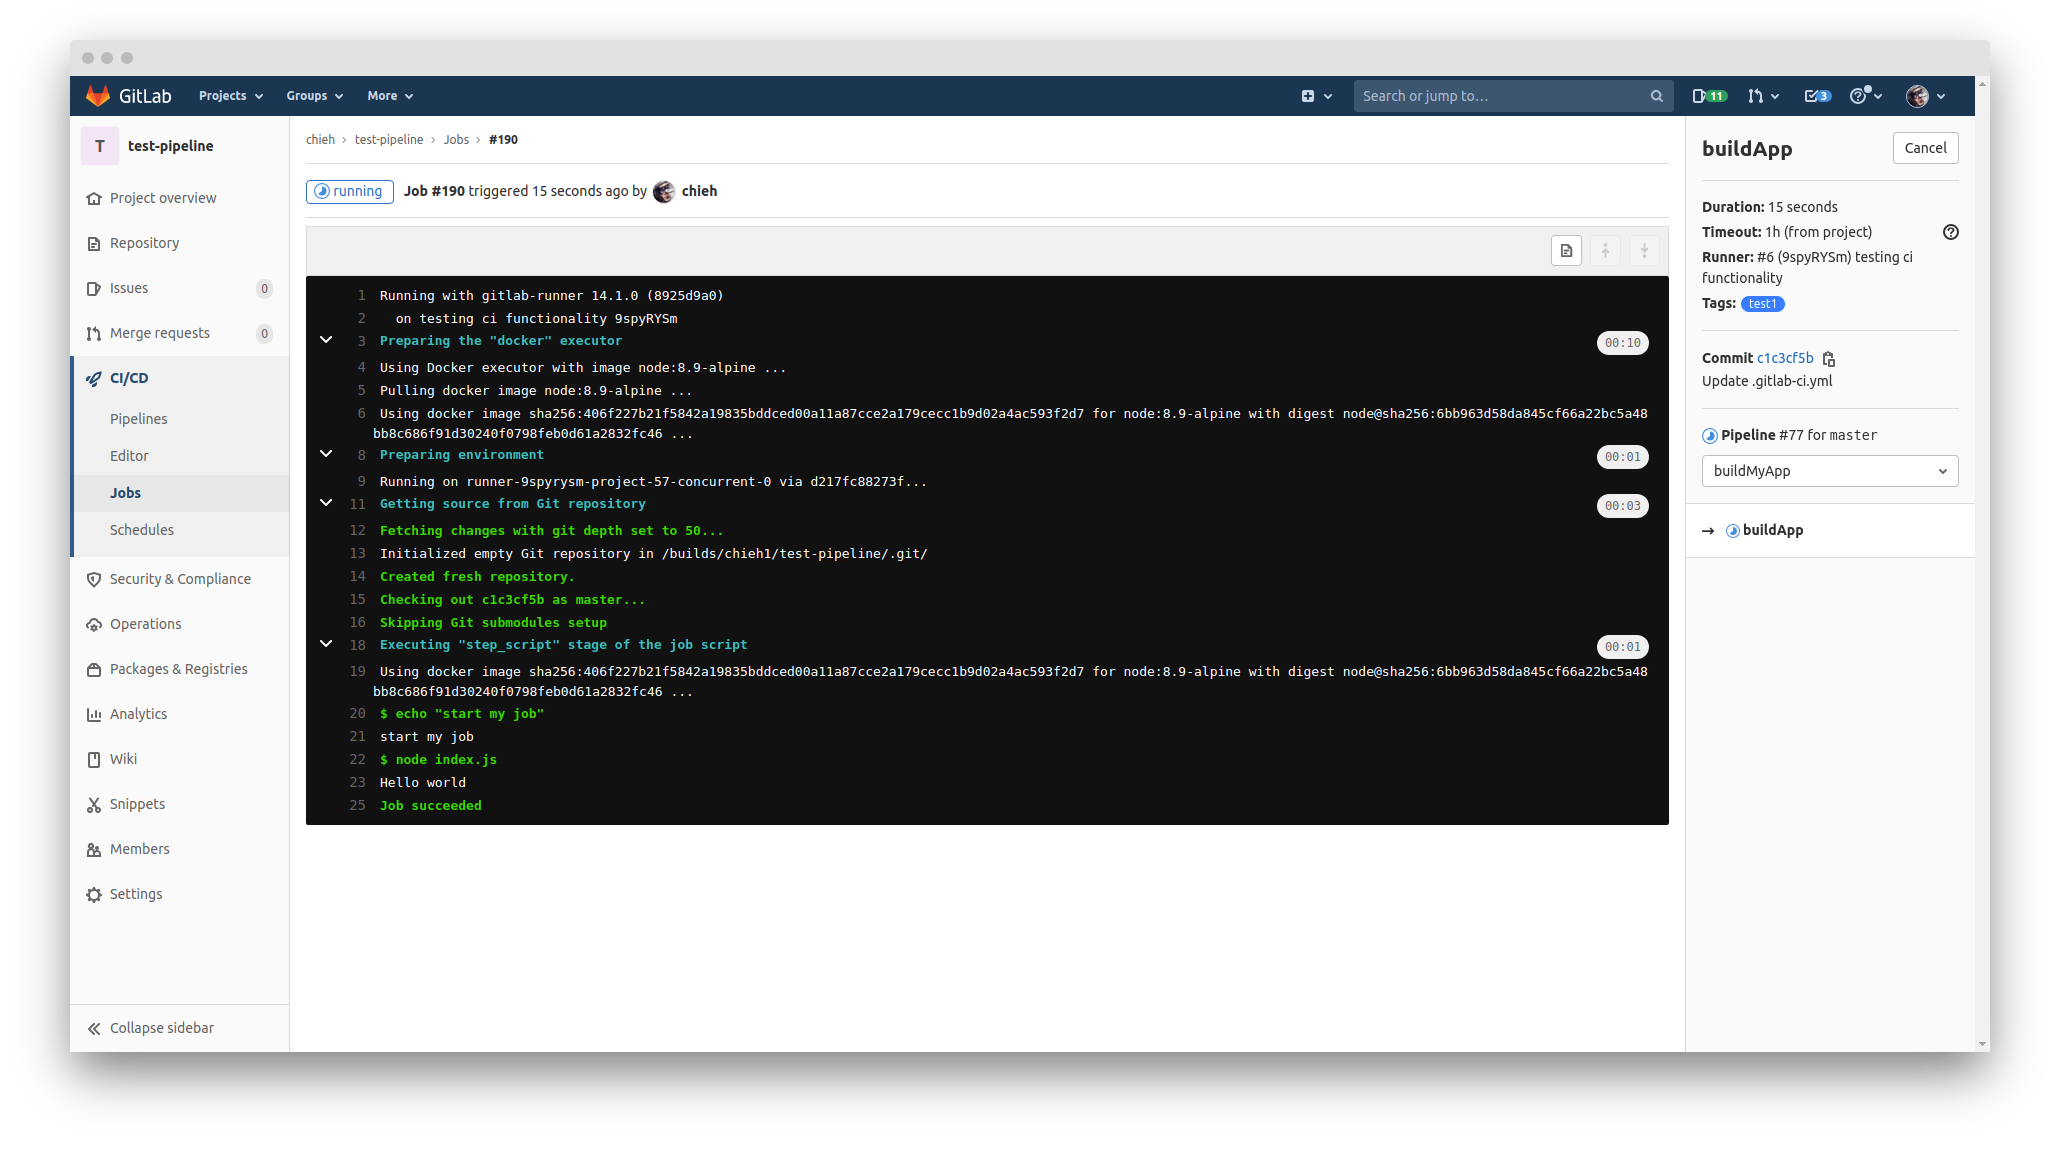
After it finishes successfully, it will show the passed on the status of pipelines.
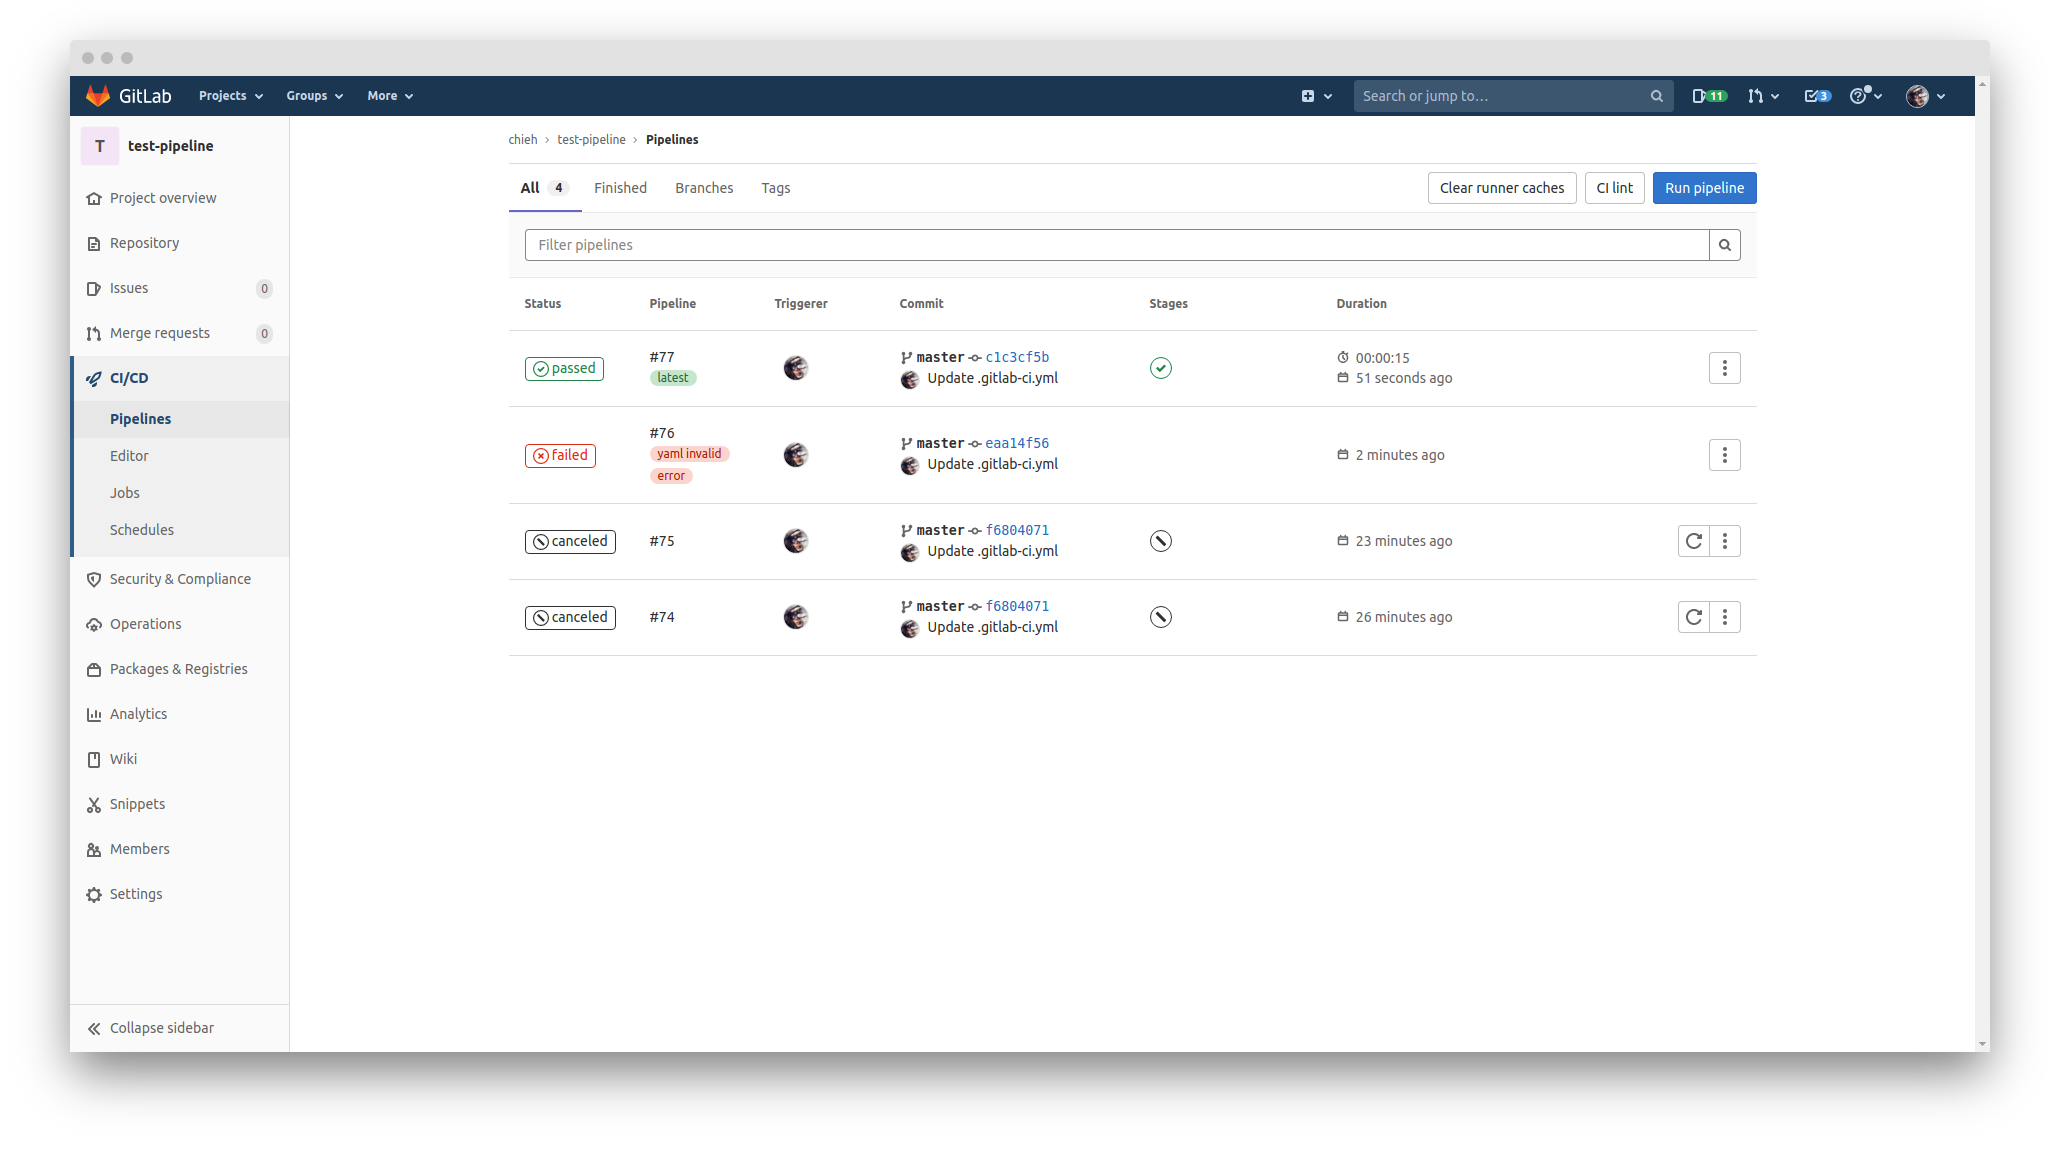
If your gitlab-ci.yaml format wrong, you can go to CI lint of the pipelines page to validate the format.
Set up a Windows runner
Please check the official document from here.
The entire steps of the installation and runner setup as follows:
First of all, I downloaded the 64-bit runner that the name should be
gitlab-runner-windows-amd64.Rename it to
gitlab-runnerCreate a folder in order to let this runner work in the future.
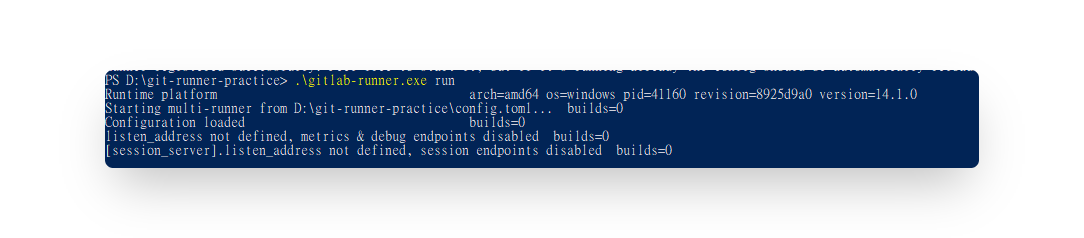
Open the terminal (or powershell) `
./gitlab-runner.exe install
./gitlab-runner.exe start
Let's start to register this runner from GtiLab
./gitlab-runner.exe register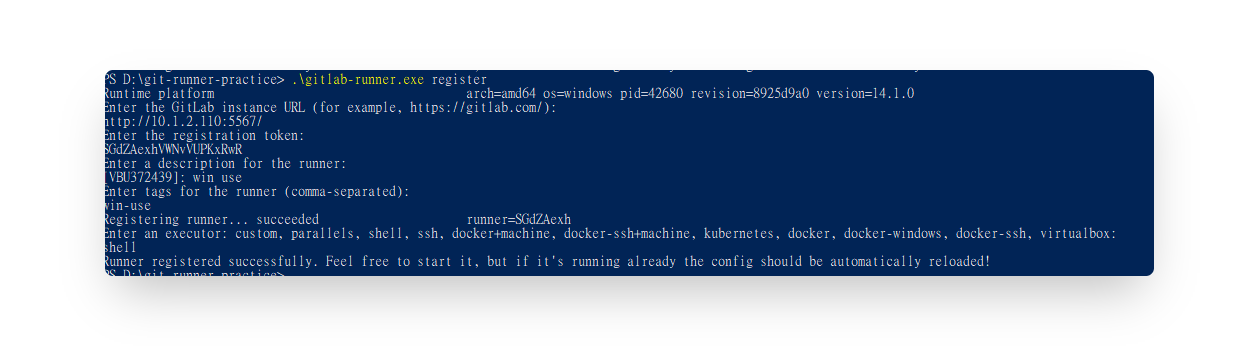
Just change the path to yours.
Notice: We won't use
dockerin the executor area here, so please fill inshell.After we register, it will also generate a
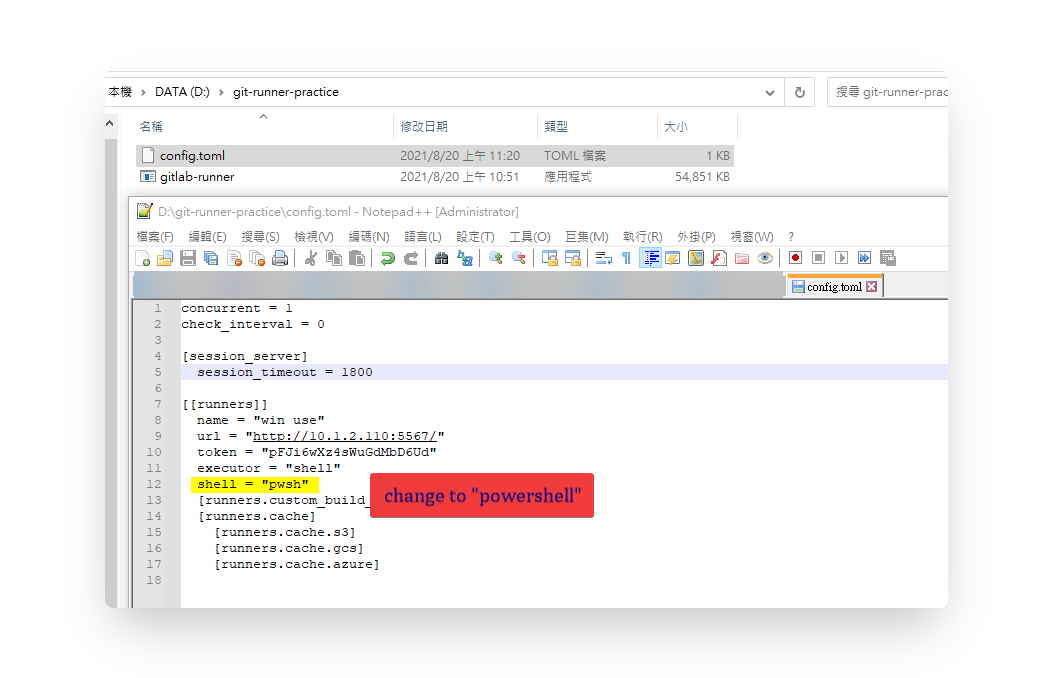
config.tomlfile in the same folder.Open it and we will modify one line.
Please amend the shell = "pwsh" to "powershell".
- Let's go back to the Runner area of settings of your repository that we can see the status of this runner. Now it is working.
- Let's run this runner.
- Then you can use it in your CI script by tag now.
Advanced CI mechanism manipulation
Only allow the specific branch to trigger CI mechanism.
Define in the .gitlab-ci.yml file.
image: node:8.9-alpine

stages:
    - buildMyApp

buildApp:
    stage: buildMyApp
    tags:
        - linux_x64
    script:
        - echo "start my job - here is the branch-test Not master."
        - node index.js
        - cat README.md
    rules:
        - if: $CI_COMMIT_BRANCH == "branch-test"
Add the rules in that job.
rules:
        - if: $CI_COMMIT_BRANCH == "branch-test"
Of course, if you wanna only trigger CI in master, or default-branch, you can set like this.
rules:
        - if: $CI_COMMIT_BRANCH == $CI_DEFAULT_BRANCH
Or you can use alternative way like below:
only:
        - (your branch name)
Connect build and test stages
In this scenario, I have an analysis tool that I request to use .so files which are generated from py files to compute my analysis.
Hence, I define two stages that first stage is to build the .so files and also save these .so files on Gitlab server. (we can download it from Gitlab CI/CD area.) Second stage is to take those (.so) files from first stage to compute the analysis. In addition, it can help me to identify which .so files can work well or not.
In this .gitlab-ci.yml, it can achieve these things below:
- Build files.
- Keep the files from CI mechanism on GitLab if the CI stage is success.
- Take the files of previous stage generated to use in the next stage.
- Trigger CI on the specific branch.
image: python:3.6

stages:
    - build
    - test

build-pyd:
    stage: build
    tags:
        - linux_x64
    script:
        - echo "Start to build (.so) file in linux."
        - chmod +x build.sh
        - ./build.sh
    only:
        - analysis-tool
    artifacts:
        when: on_success
        # expose_as: 'artifact 1'
        paths: ['pyd-files/linux/*.so']

test-analysis-job1:
    stage: test
    tags:
        - linux_x64
    script:
        - echo "Start to test the analysis of normal case with .so file in linux."
        - python3 -V
        - python3 test-code/test-analysis.py
        - echo "Done."
    only:
        - analysis-tool
    dependencies:
        - build-pyd
For this part, I did not provide any example.
Use GPU during the CI stage
As we know, a majority of jobs ask for GPU on deep learning / AI domain. Hence, let's take a look how to enable the GPU during CI stage.
Mainly we need to add one line in config.toml file.
  [runners.docker]
    gpus = "all"
Let's create an newer runner for testing gpu use.
In my config.toml, it looks like below:
concurrent = 1
check_interval = 0

[session_server]
  session_timeout = 1800

[[runners]]
  name = "test-gpu"
  url = "http://(Gitlab url)/"
  token = "(this runnner token)"
  executor = "docker"
  [runners.custom_build_dir]
  [runners.cache]
    [runners.cache.s3]
    [runners.cache.gcs]
    [runners.cache.azure]
  [runners.docker]
    gpus = "all"
    tls_verify = false
    image = "pytorch/pytorch:1.9.0-cuda10.2-cudnn7-runtime"
    privileged = false
    disable_entrypoint_overwrite = false
    oom_kill_disable = false
    disable_cache = false
    volumes = ["/cache"]
    shm_size = 0
After we amend the config file of this runner, add one job for dealing with gpu testing. Then let's start it.
stages:
- test_gpu
useGPU:
image: pytorch/pytorch:latest
stage: test_gpu
tags:
- test-gpu
script:
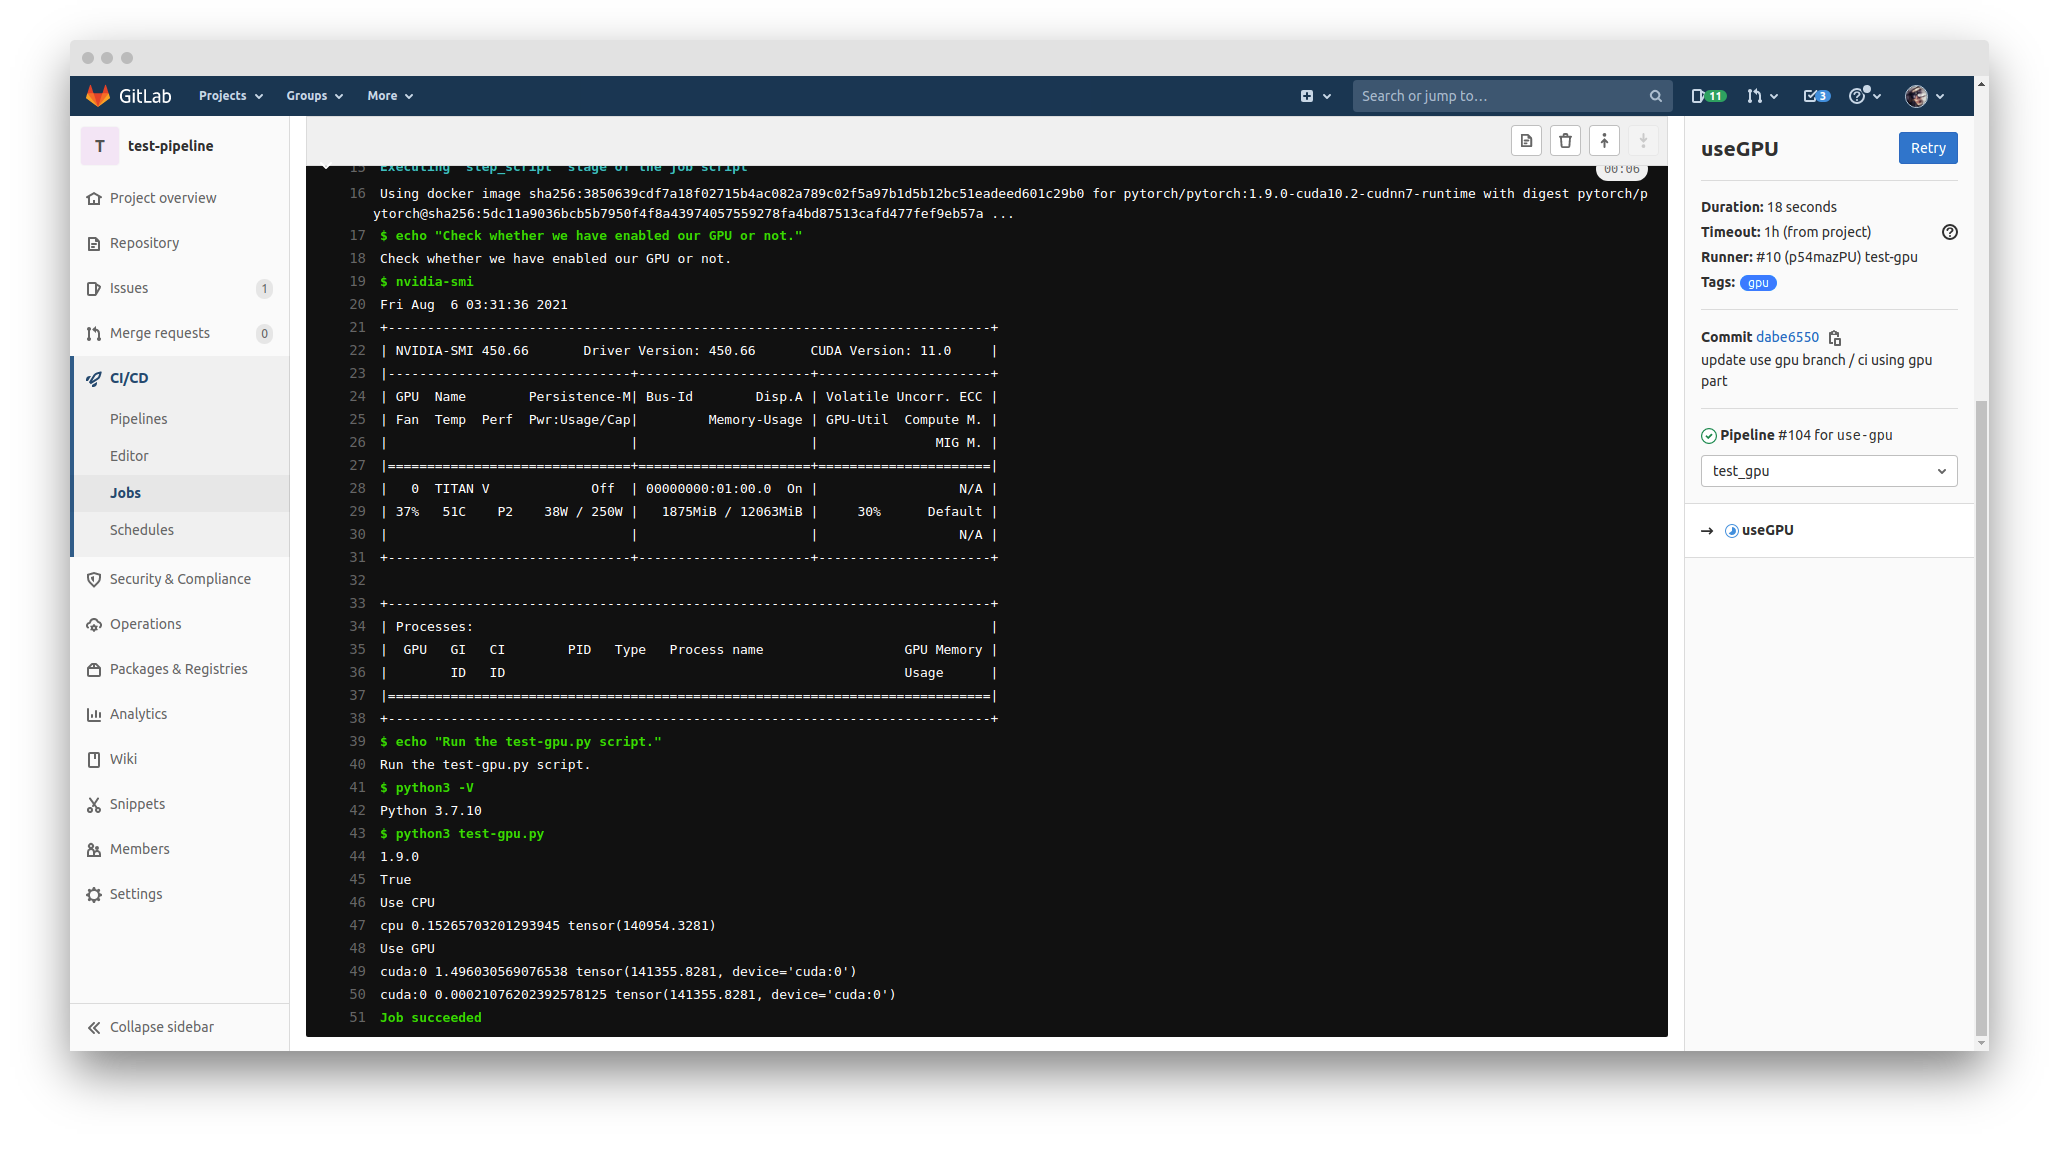
- echo "Check whether we have enabled our GPU or not."
- nvidia-smi
- echo "Run the test-gpu.py script."
- python3 -V
- python3 test-gpu.py
rules:
- if: $CI_COMMIT_BRANCH == "use-gpu"
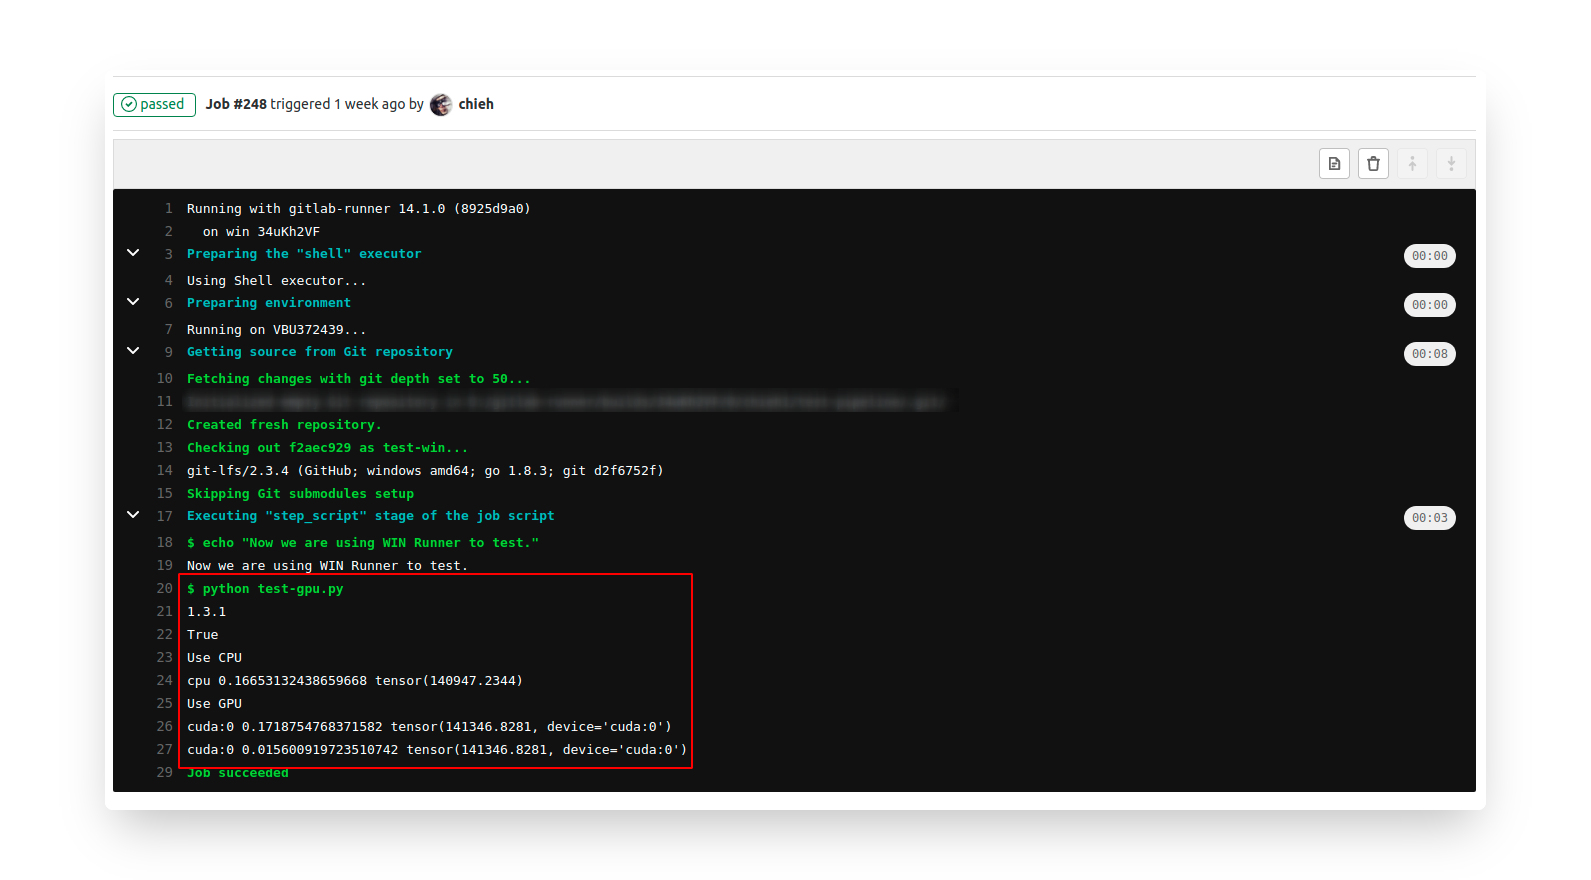
I prepared one script for testing GPU by Pytorch, and we can see the result which used the GPU successfully.
For this testing, you have to checkout to use-gpu branch to test it. Otherwise, you can amend the branch from use-gpu to master in the gitlab-ci.yml file.
Windows Setup
In the win part, there is a little bit tricky point that it is quite complicated to use the GPU in docker images (we are talking about the default setting.). Hence, we just directly use the host GPU and run everything on host without using docker images. (i.e., it means that we will directly use the host environment.)
We have to create a runner on Windows system, and set up this runner in GitLab. If you did not have an available runner, please check this section of my setup instruction.
My host environment of WIN was set GPU already. It can run the GPU with Python script normally without any error in the host side. Hence, we do not need to set GPU information in the toml scirpt or CI script.
Set up our CI script to test GPU in WIN runner, you can checkout to my
test-winbranch. Here is the partial CI yml file:testWIN:
stage: buildMyApp
tags:
- win
script:
- echo "Now we are using WIN Runner to test."
- python test-gpu.py
rules:
- if: $CI_COMMIT_BRANCH == "test-win"